Accept Apple Pay in your website using Finix.
Buyers that use Safari as their browser have the option to use Apple Pay as a payment method when making online purchases. This guide details how to start accepting Apple Pay on your website using Finix.
You can see a demo of Apple Pay on our sample store. All of the code on our sample store is available on Github here.
The Apple Pay button will not render in the Finix Sample Store unless the user is logged in on the Apple Developer site.
In this sample store, you can add a few items to your cart and click on Pay with Tokenization Form.

You'll see an express checkout button that will bring up the Apple Pay button. Our sample store uses sandbox credentials so you won't get charged. 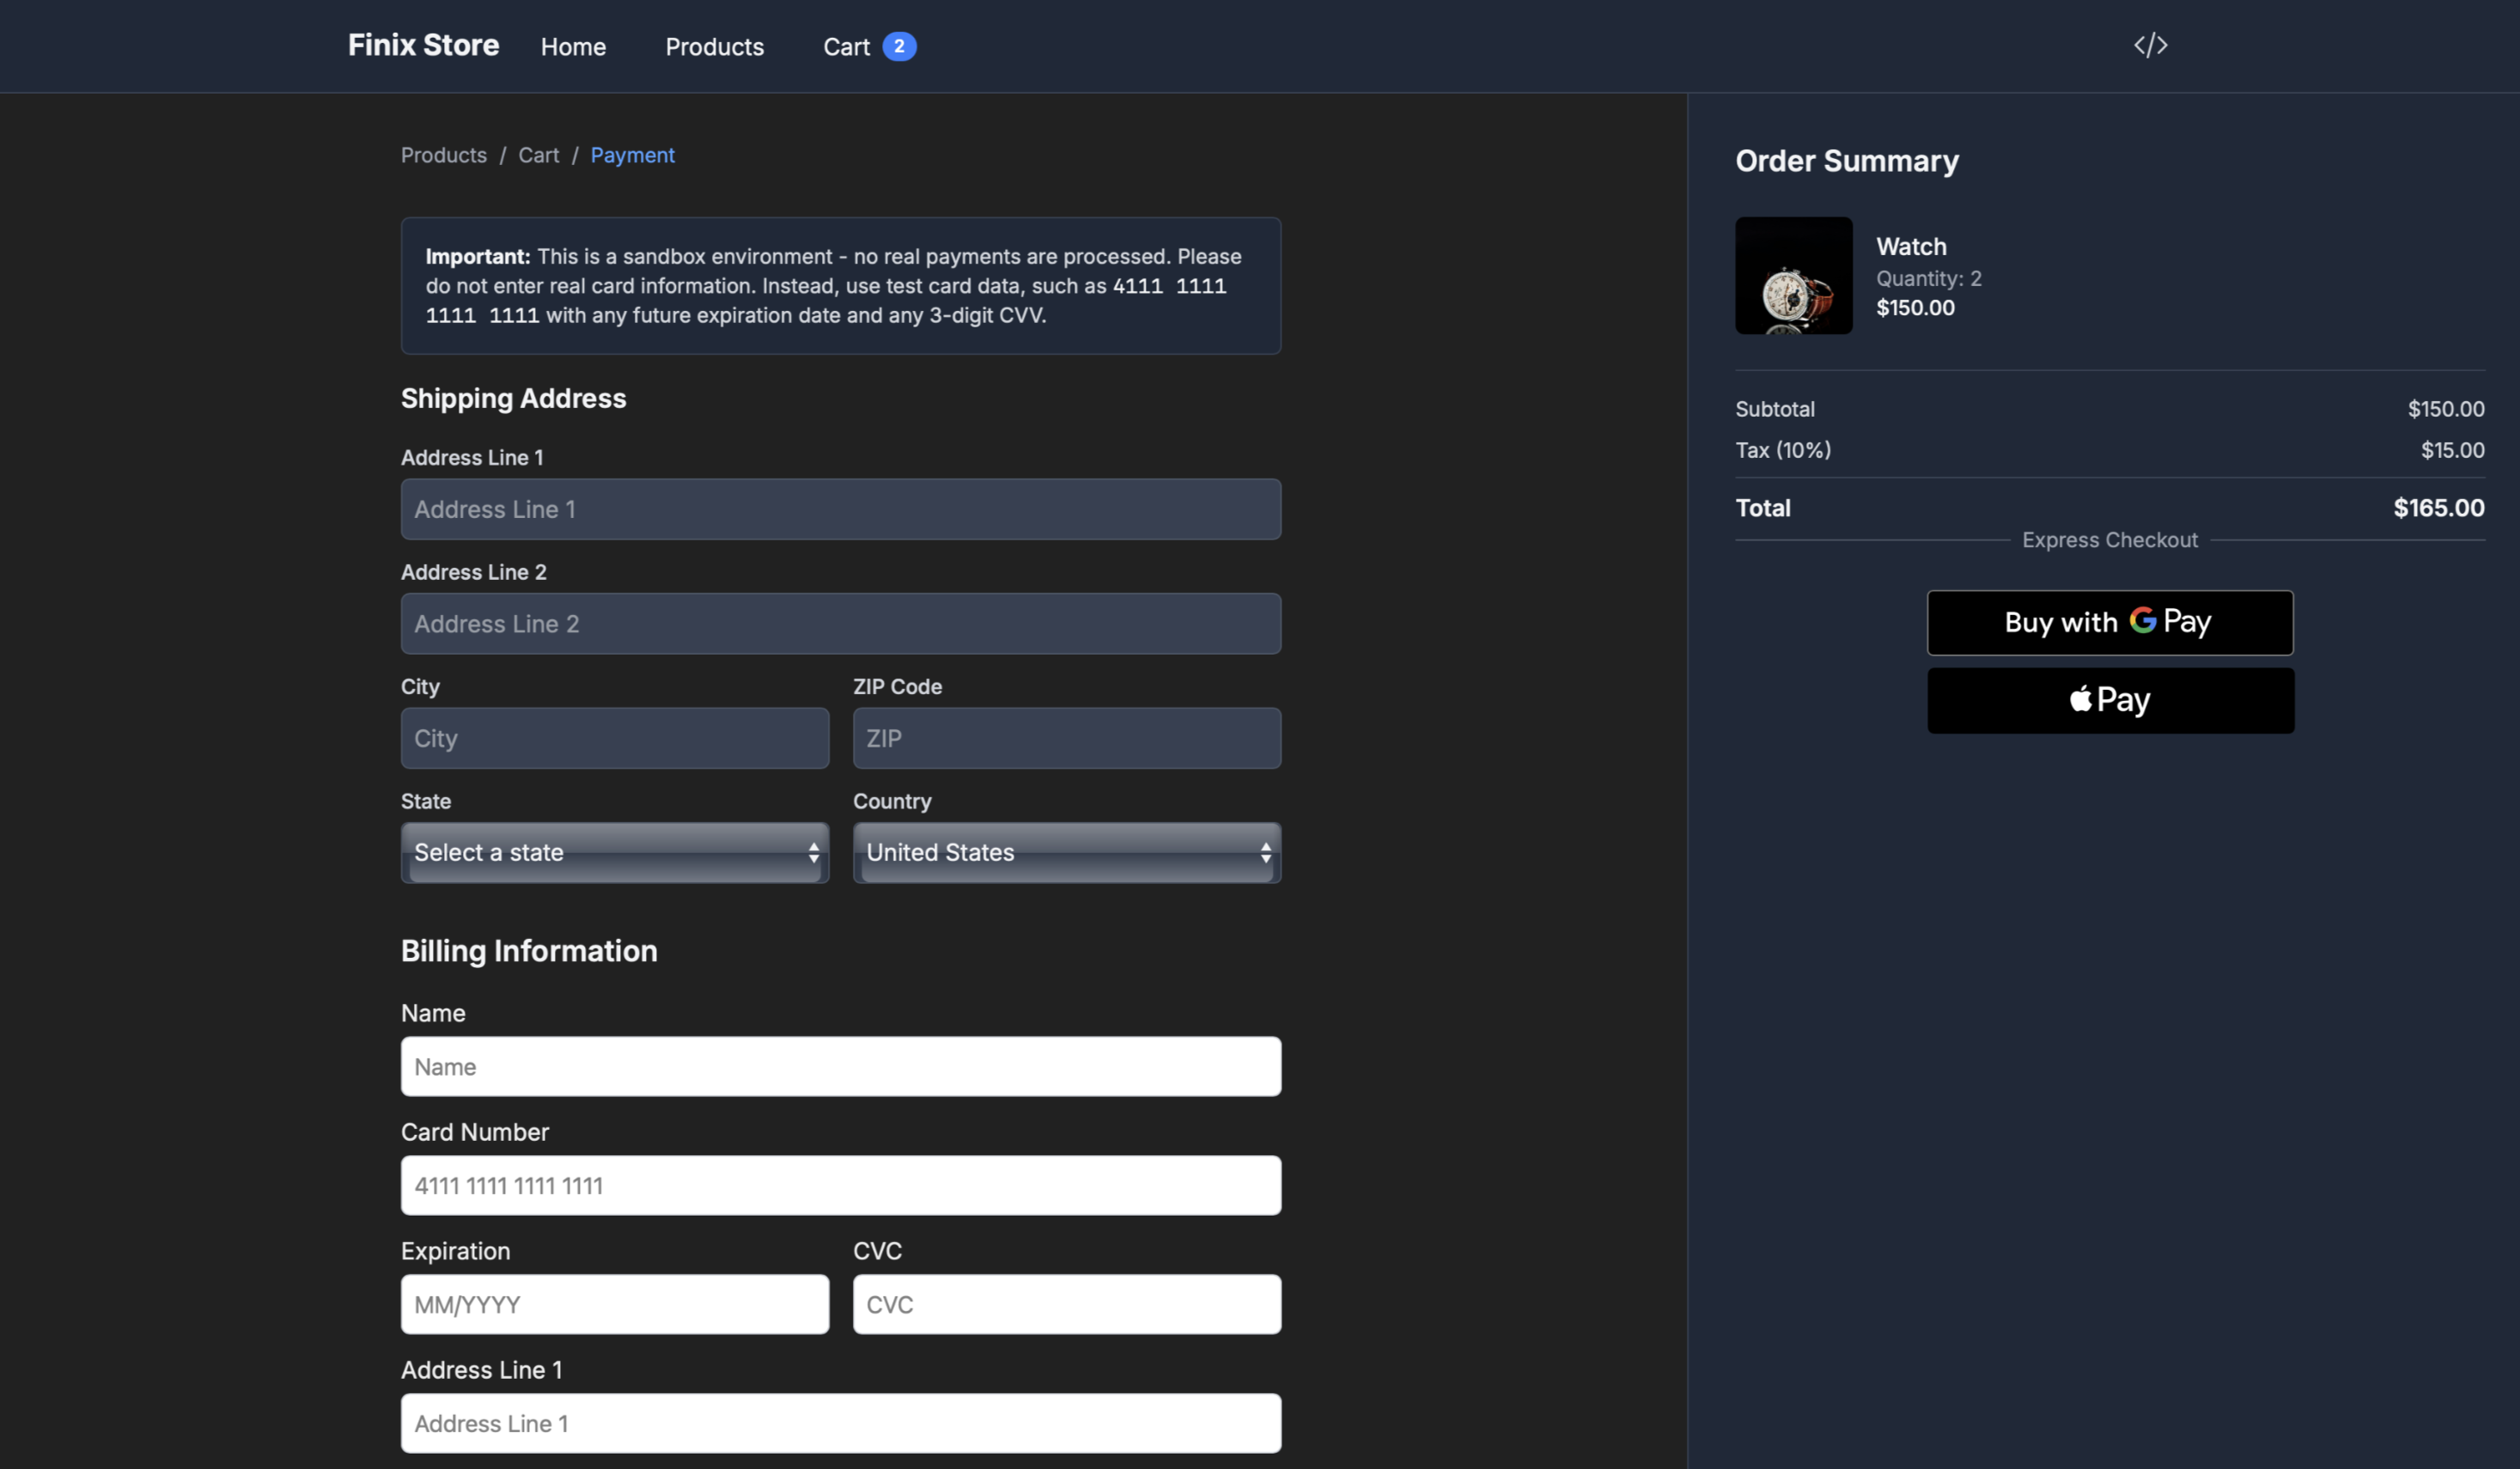
Start by familiarizing yourself with the prerequisites for using Apple Pay with Finix.
Before you can begin accepting Apple Pay, you need to first verify and register your domain with Apple. You can complete this step with the Finix Dashboard. After you've registered the domain, download the verification file from file and host it on your website.
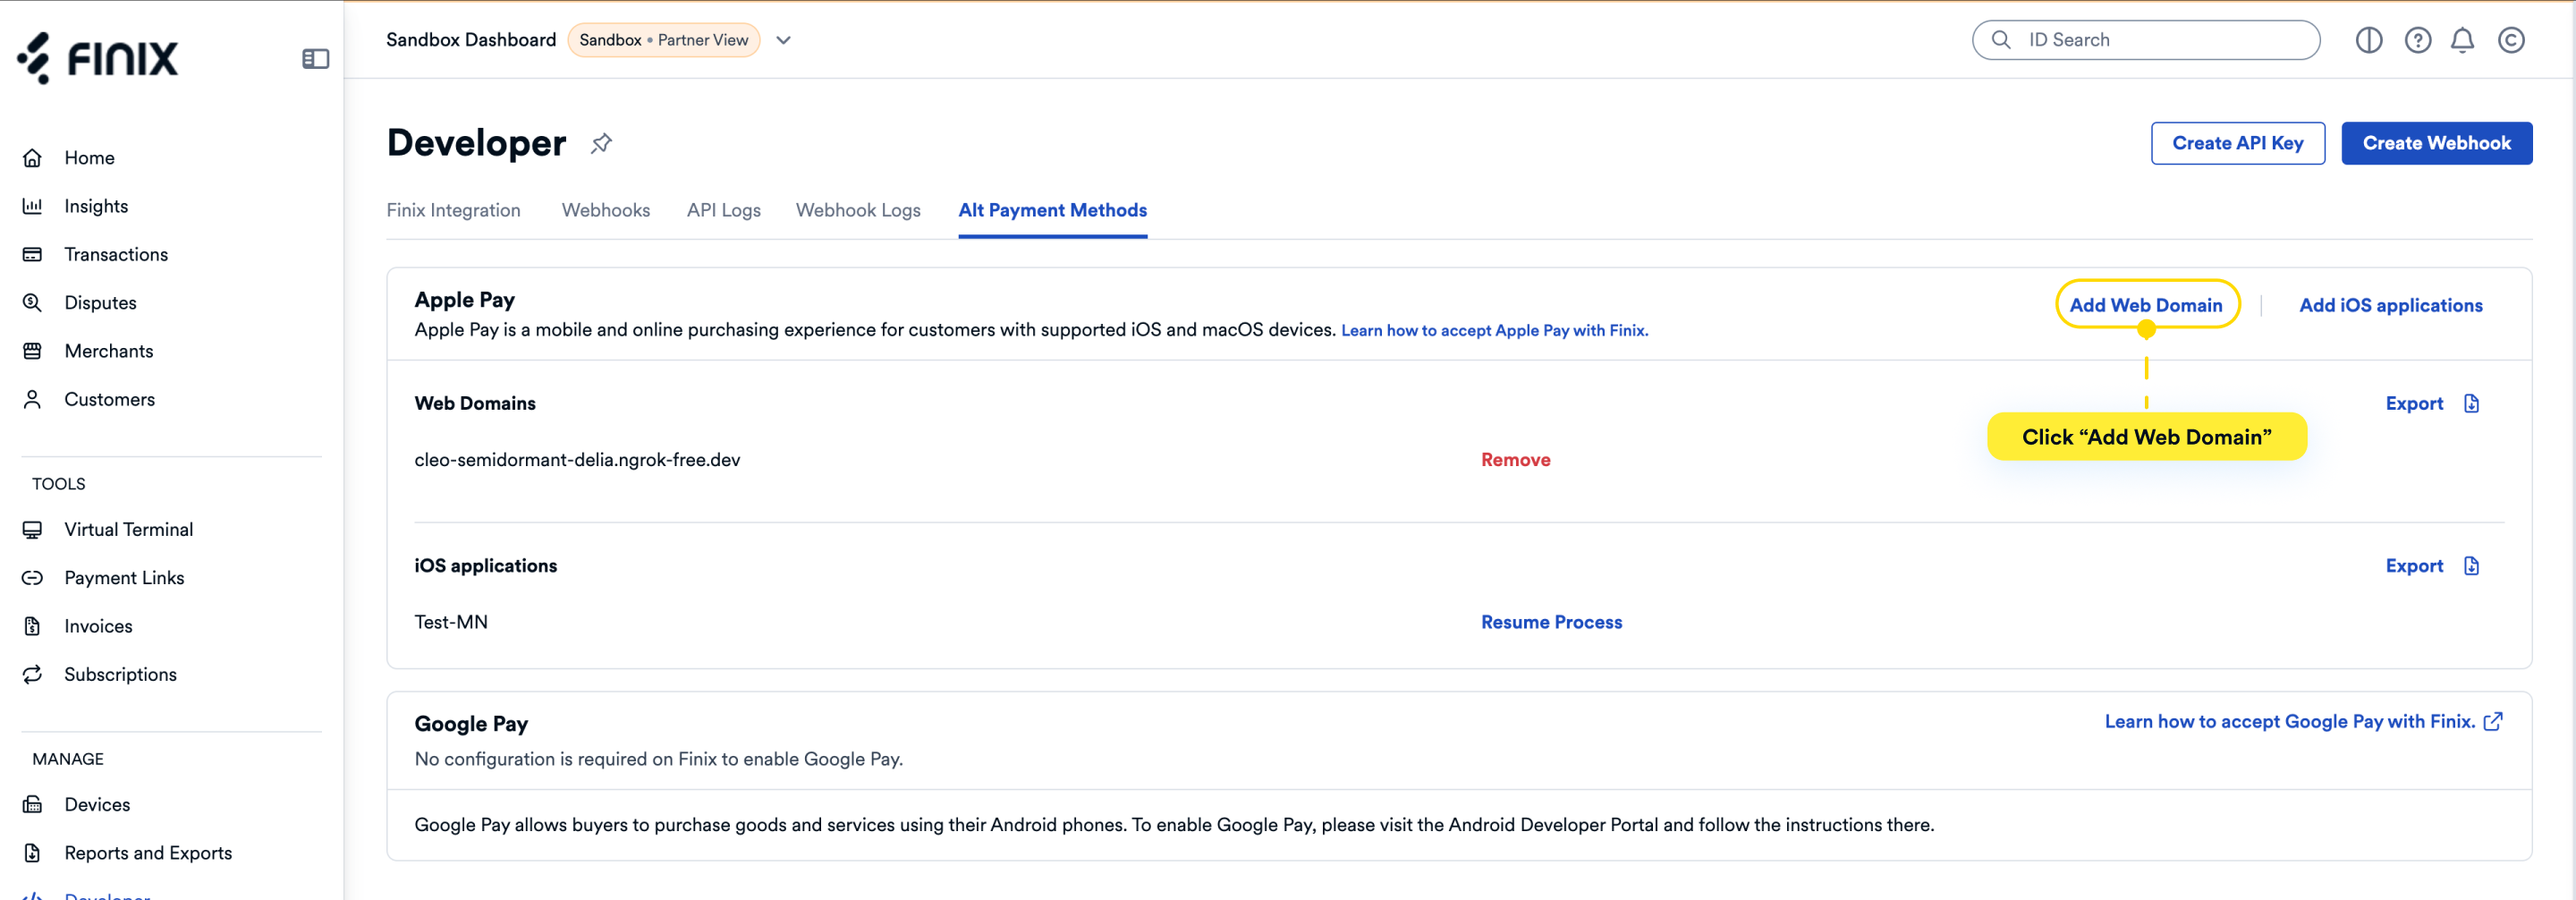
To register on the Finix Dashboard on the Application Level:
- Log in to your Finix Dashboard and click Developer.
- Click Alt Payment Methods tab.
- Click Add Web Domain and follow the instructions to host the verification file.
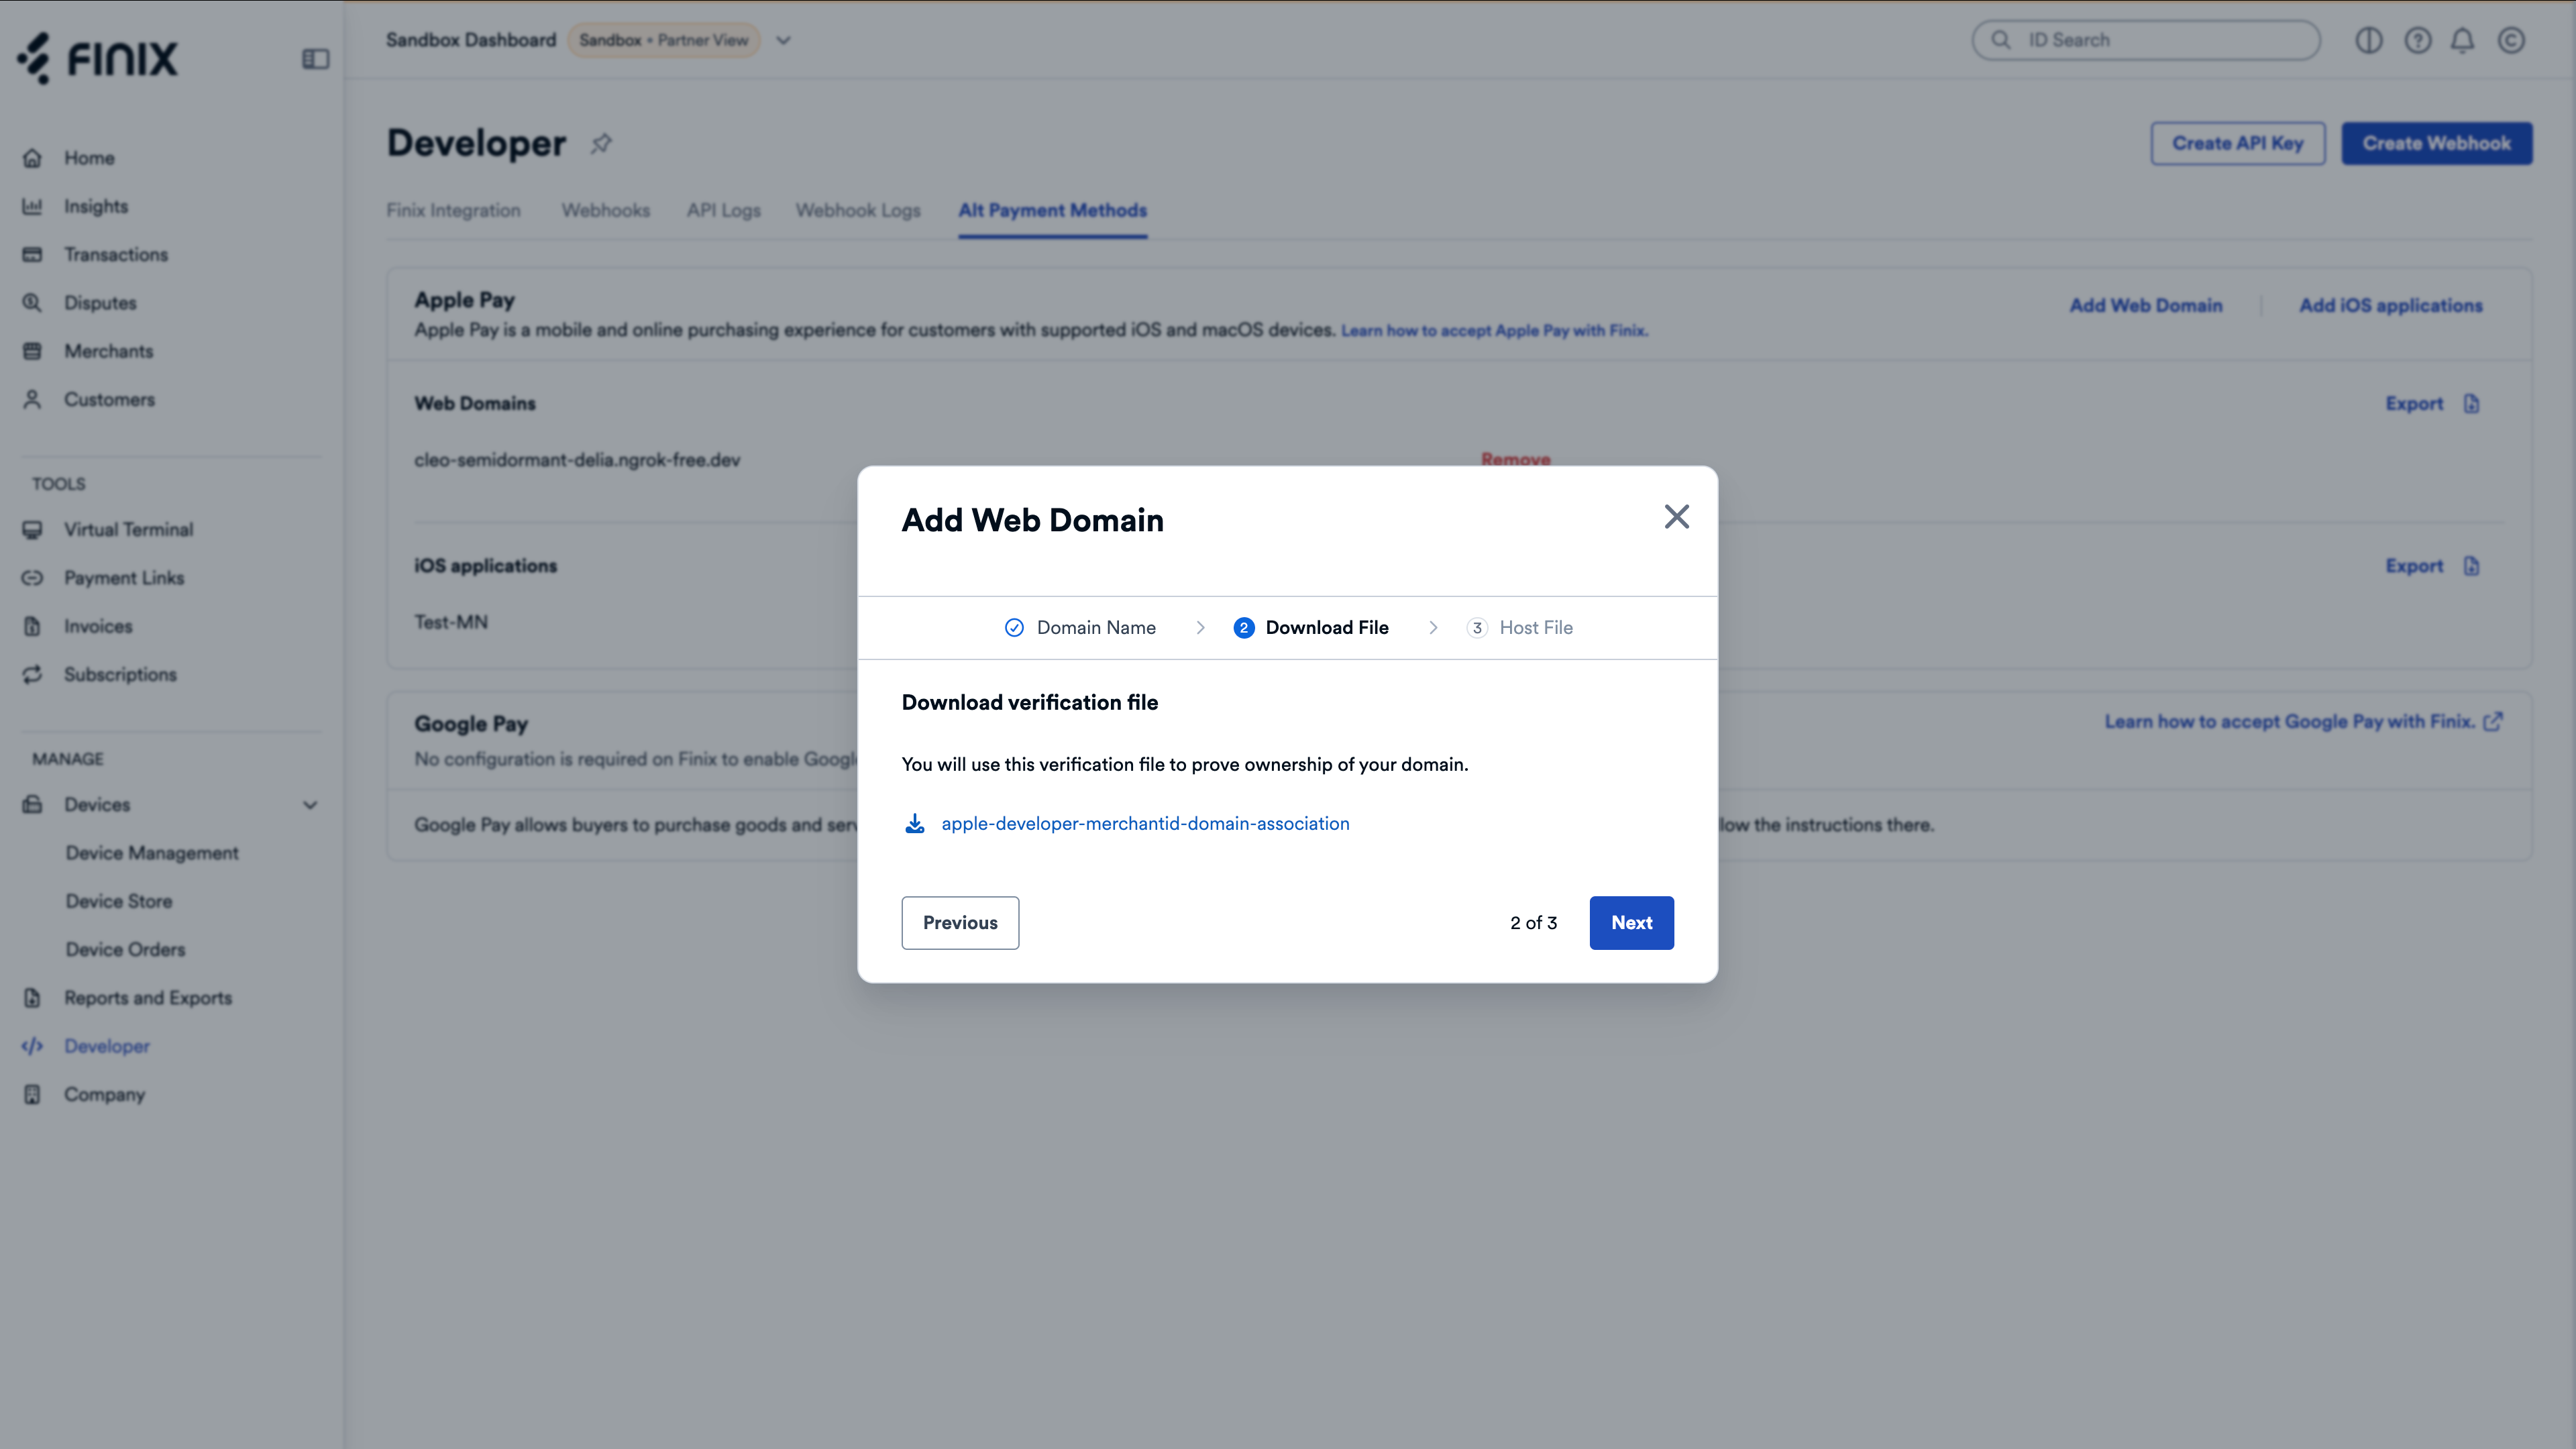
 Don't close the modal until you've hosted the verification file.
Do not click Submit on Step 3 in the modal unless you've uploaded the verfication file generated by Finix in the steps below.
- Enter a domain name.

- Download the verification file.
- Host the verification file at this location:
/.well-known/apple-developer-merchantid-domain-association.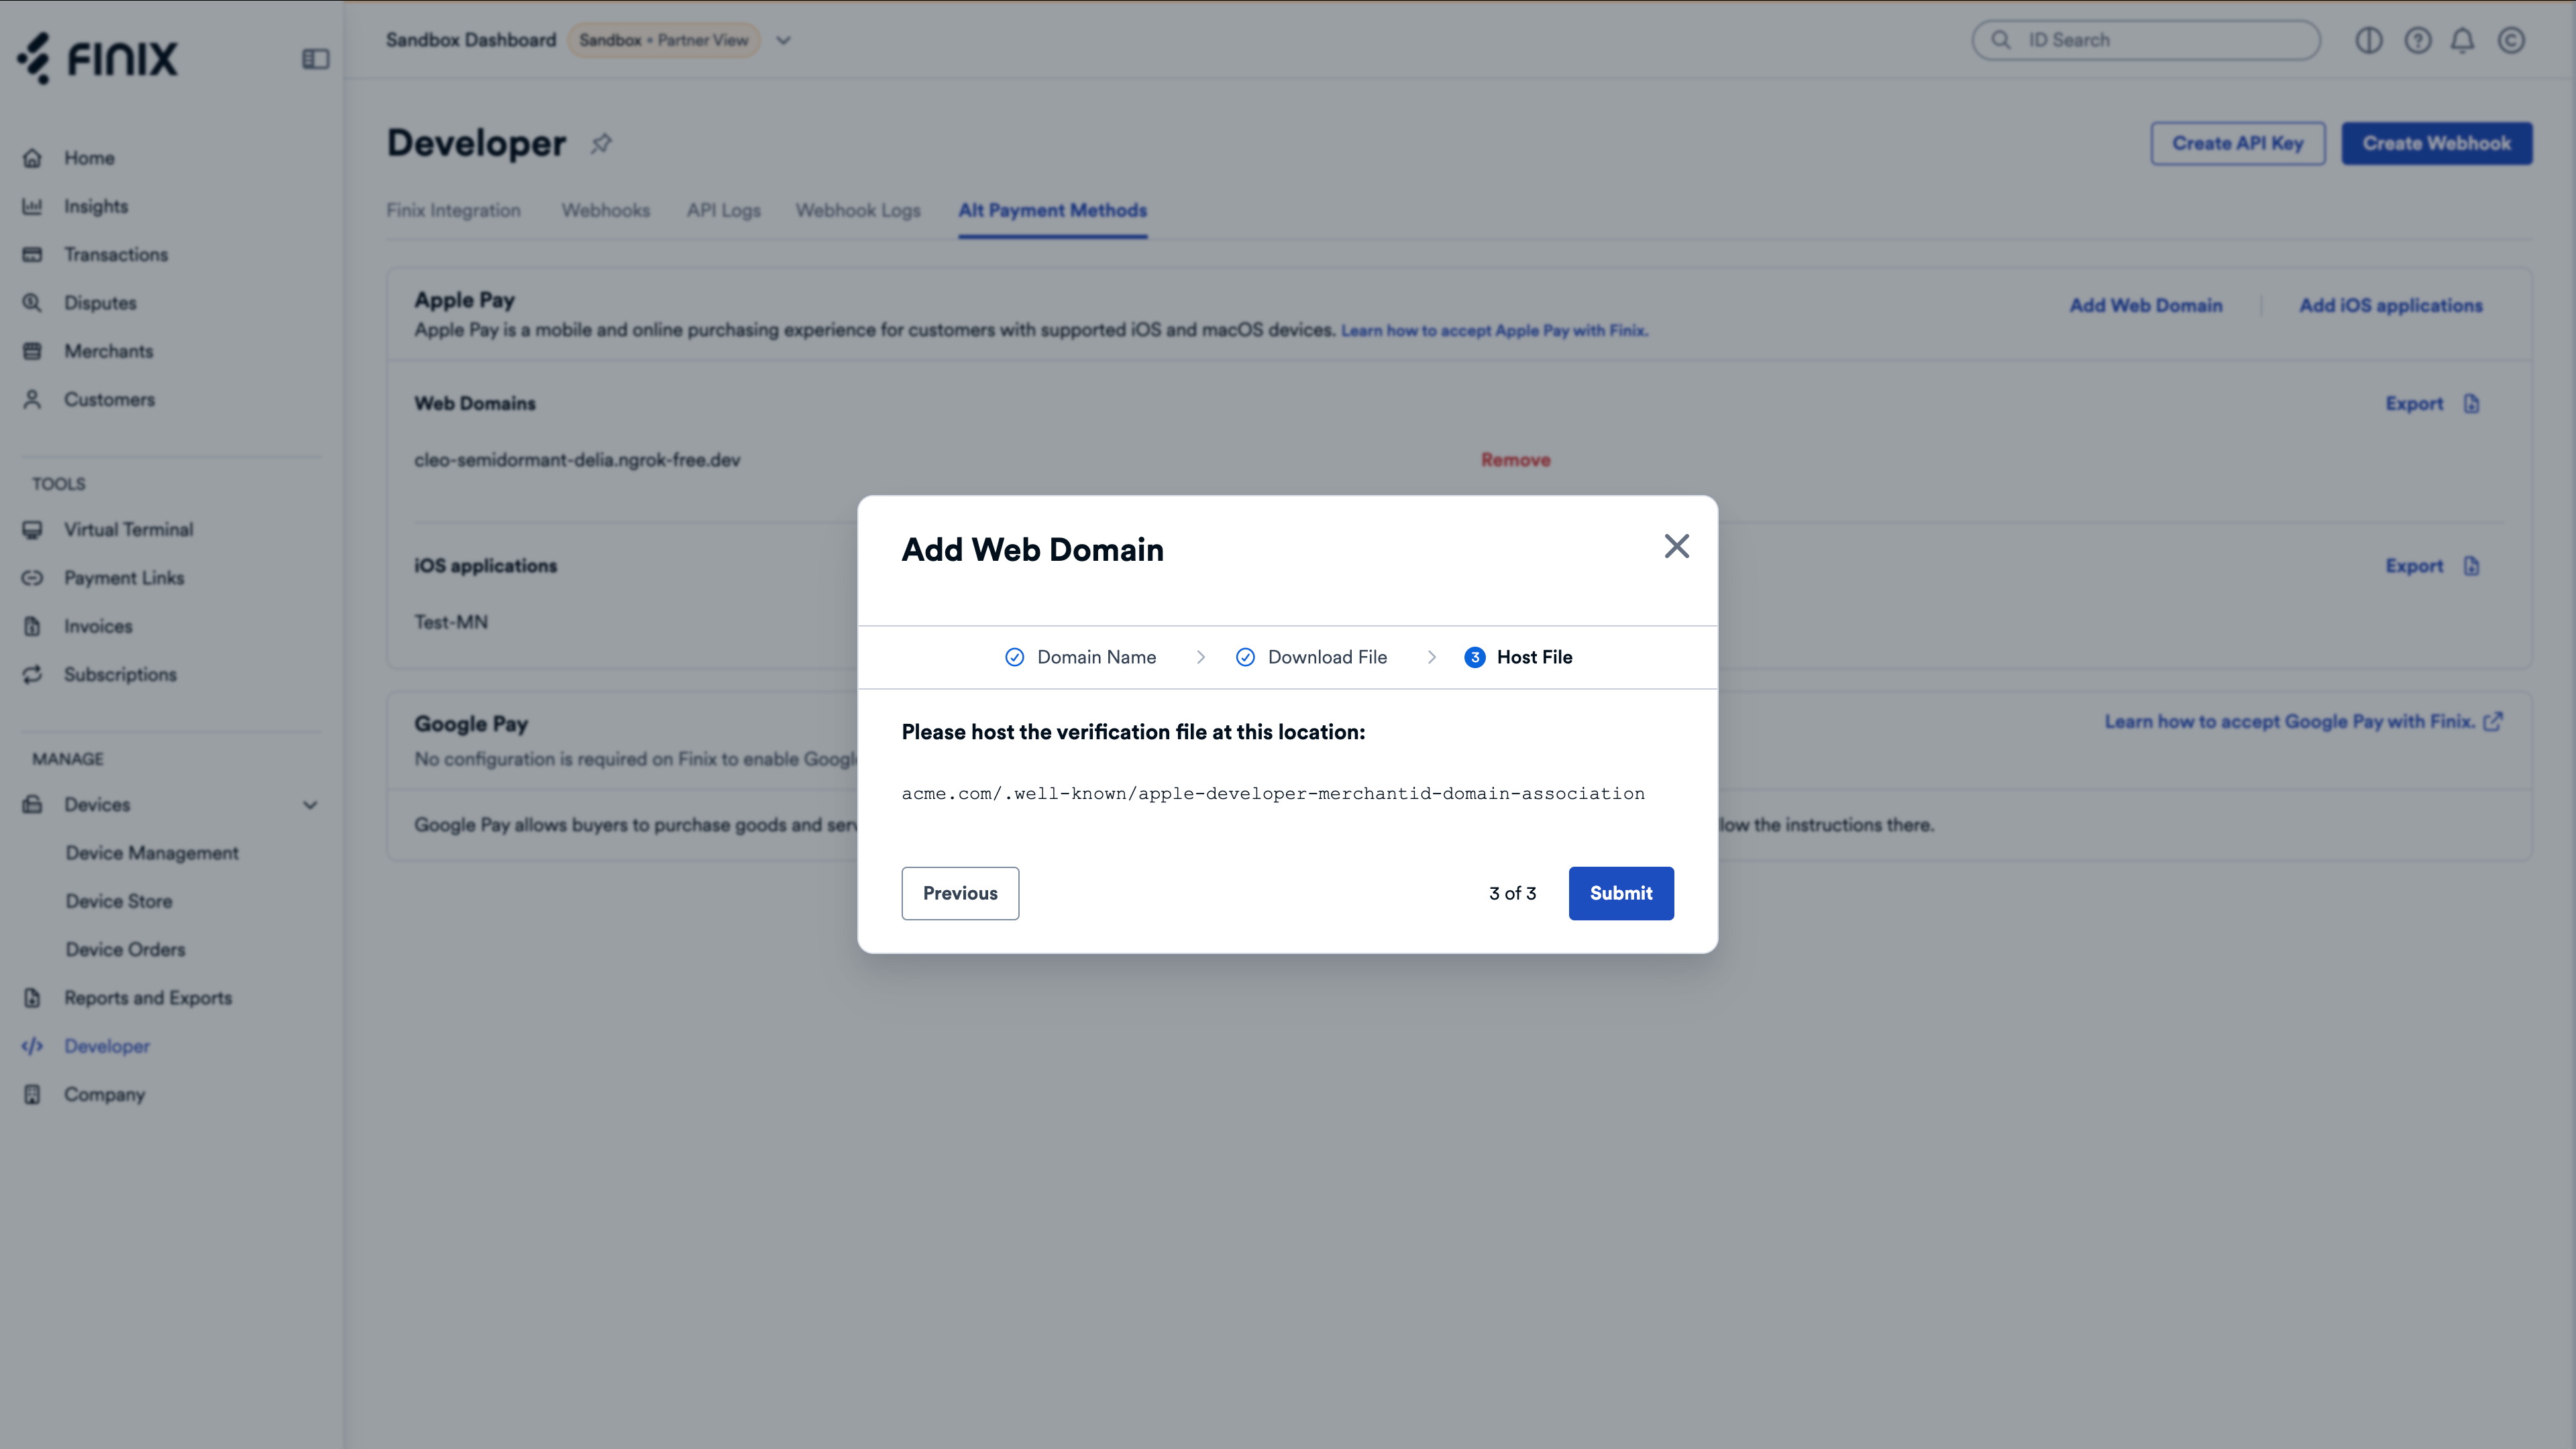
After verifying and registering your domains with Apple, you need to add the Apple Pay Library. Including this script in your website allows your site to make calls to the Apple Pay API.
<script src="https://applepay.cdn-apple.com/jsapi/1.latest/apple-pay-sdk.js"></script>After you have added the Apple Pay Library, add an HTML element and name it apple-pay-button.
Please note that Apple requires the button to be named apple-pay-button
| Field | Type | Description |
|---|---|---|
buttonstyle | string, optional | Color of the button. Available values are black, white, and white-outline |
type | string, required | There are a variety of button types that you can use on your website to initiate the transaction. Available Button Types - Buy (default), Plain, Add Money, Book, Checkout, Continue, Contribute, Donate, Order, Pay, Reload, Rent, Set Up, Subscribe, Support, Tip, Top Up. |
locale | string, required | Set the language of the button. |
To demo all of the Apple Pay button styles, see Apple Pay's interactive demo.
<style>
  apple-pay-button {
    --apple-pay-button-width: 150px;
    --apple-pay-button-height: 30px;
    --apple-pay-button-border-radius: 3px;
    --apple-pay-button-padding: 0px 0px;
    --apple-pay-button-box-sizing: border-box;
  }
</style>
<apple-pay-button
  buttonstyle="black"
  type="plain"
  locale="en"
></apple-pay-button>We recommend that you pass the address field listed in the steps below. If the address is not passed, you will be charged additional dues and assessments per transaction from the card network.
After adding an Apple Pay button, you need to instantiate the ApplePaySession by invoking the begin function. To collect a billing address from buyers, pass in requiredBillingContactFields.
| Field | Type | Description |
|---|---|---|
countryCode | string, optional | The ISO country code. |
currencyCode | string, required | The currency code of the locale. |
merchantCapabilities | string, required | The payment types, such as credit or debit, supported by the merchant. The value supports3DS is required. |
supportedNetworks | string, optional | The payment networks the merchant supports. Included Networks: Amex, Discover, JCB, Discover, Mastercard, Visa. |
total | object, required | The label field is a short, localized description of the line item. The amount field is the monetary amount of the line item that follows this format: 0.00 |
requiredBillingContactFields | string, optional | Pass in postalAddress to obtain a postal address as well as the buyer's name after the buyer authorizes the transaction. If you do not retrieve the address to pass to Finix, fees will apply. |
var createAndStartApplePaySession = function(description, amount) {

 var applePaySession = new ApplePaySession(6, {
   "countryCode": "US",
   "currencyCode": "USD",
   "merchantCapabilities": ["supports3DS"],
   "supportedNetworks":  [ "visa", "masterCard", "amex", "discover"],
   "total":  { "label": description, "amount": amount }},
   "requiredBillingContactFields": ["postalAddress"]
 );

 applePaySession.begin();
}A buyer identity is required before you can proceed with the next steps. You can either create a new buyer identity through the Finix API, or use an existing one you’ve already created.
All buyer Identity fields are optional. However, Finix recommends including basic information (name, email, address, and phone) to make payment operations easier.
Use an existing buyer
- Log in to your Finix Dashboard.
- In the left sidebar, select Data Resources → Identities.
- Search for the buyer identity you want to use.
- Confirm the Role is Buyer.
- Option to use filters to quickly narrow down results.
- Copy the Buyer Identity (e.g.
IDjWktr7BPDGhz4amrPJZoXg)
Create a new buyer
curl -i -X POST \
  -u USfdccsr1Z5iVbXDyYt7hjZZ:313636f3-fac2-45a7-bff7-a334b93e7bda \
  https://finix.sandbox-payments-api.com/identities \
  -H 'Content-Type: application/json' \
  -H 'Finix-Version: 2022-02-01' \
  -d '{
    "entity": {
      "phone": "7145677613",
      "first_name": "John",
      "last_name": "Smith",
      "email": "finix_example@finix.com",
      "personal_address": {
        "city": "San Mateo",
        "country": "USA",
        "region": "CA",
        "line2": "Apartment 7",
        "line1": "741 Douglass St",
        "postal_code": "94114"
      }
    },
    "identity_roles": [
      "BUYER"
    ],
    "tags": {
      "key": "value"
    },
    "type": "PERSONAL"
}'{
"id": "IDmkDvJfxZWMEK56FDFtbozo",
"created_at": "2024-08-09T09:34:36.87Z",
"updated_at": "2024-08-09T09:34:36.87Z",
"application": "APgPDQrLD52TYvqazjHJJchM",
"entity": {
"ach_max_transaction_amount": 0,
"amex_mid": null,
"annual_card_volume": 0,
"business_address": null,
"business_name": null,
"business_phone": null,
"business_tax_id_provided": false,
"business_type": null,
"default_statement_descriptor": null,
"discover_mid": null,
"dob": null,
"doing_business_as": null,
"email": "finix_example@finix.com",
"first_name": "John",
"has_accepted_credit_cards_previously": false,
"incorporation_date": null,
"last_name": "Smith",
"max_transaction_amount": 0,
"mcc": null,
"ownership_type": null,
"personal_address": {
"line1": "741 Douglass St",
"line2": "Apartment 7",
"city": "San Mateo",
"region": "CA",
"postal_code": "94114",
"country": "USA"
},
"phone": "7145677613",
"principal_percentage_ownership": null,
"short_business_name": null,
"tax_authority": null,
"tax_id_provided": false,
"title": null,
"url": null
},
"identity_roles": [],
"tags": {
"key": "value"
},
"type": "PERSONAL",
"_links": {
"self": {
"href": "https://finix.sandbox-payments-api.com/identities/IDmkDvJfxZWMEK56FDFtbozo"
},
"verifications": {
"href": "https://finix.sandbox-payments-api.com/identities/IDmkDvJfxZWMEK56FDFtbozo/verifications"
},
"merchants": {
"href": "https://finix.sandbox-payments-api.com/identities/IDmkDvJfxZWMEK56FDFtbozo/merchants"
},
"settlements": {
"href": "https://finix.sandbox-payments-api.com/identities/IDmkDvJfxZWMEK56FDFtbozo/settlements"
},
"authorizations": {
"href": "https://finix.sandbox-payments-api.com/identities/IDmkDvJfxZWMEK56FDFtbozo/authorizations"
},
"transfers": {
"href": "https://finix.sandbox-payments-api.com/identities/IDmkDvJfxZWMEK56FDFtbozo/transfers"
},
"payment_instruments": {
"href": "https://finix.sandbox-payments-api.com/identities/IDmkDvJfxZWMEK56FDFtbozo/payment_instruments"
},
"associated_identities": {
"href": "https://finix.sandbox-payments-api.com/identities/IDmkDvJfxZWMEK56FDFtbozo/associated_identities"
},
"disputes": {
"href": "https://finix.sandbox-payments-api.com/identities/IDmkDvJfxZWMEK56FDFtbozo/disputes"
},
"application": {
"href": "https://finix.sandbox-payments-api.com/applications/APgPDQrLD52TYvqazjHJJchM"
}
}
}Once you start an Apple Pay session, the next step is to validate and complete an Apple Pay merchant session. After creating a session, your server securely exchanges certificates with Apple’s servers and Finix to complete the setup.
To validate an Apple Pay session, set up the onvalidatemerchant function to capture the validation URL and send it, along with merchant details, to your backend. Your server will process the request with Finix and return Apple’s validation response. Finally, call completeMerchantValidation() with the response to authorize the session.
var validateMerchantSession = function(applePaySession) {
  applePaySession.onvalidatemerchant = function(event) {
    try {
      var validationURL = event.validationURL
      console.log("Validating merchant with url: " + validationURL );

      if (validationURL) {
        var request = {
          provider: APPLE_PAY,
          validation_url: validationURL,
          merchant_identifier: merchantIdentity,
          domain_name: "www.finixtestmerchant.com",
          display_name: "Finix Test Merchant"
        }
        fetch( // call to your server which would then call Finix's /apple_pay_sessions {
          method: "POST",
          request,
          headers
        }).then((response) => {
          const sessionDetails = response['session_details']
          // need to unstringify response object
          var merchantSession = JSON.parse(sessionDetails);
          applePaySession.completeMerchantValidation(merchantSession);
        })
      } else {
        console.log("Merchant validation failed");
      }
    }
    catch(err) {
      console.log(err);
      throw err;
    }
  }
}
Next, pass the validation_url into the subsequent API request which is a POST to apple_pay_sessions. Finix returns a merchantSession object which you can use in the next step.
POST https://finix.sandbox-payments-api.com/apple_pay_sessions/
| Field | Type | Description |
|---|---|---|
display_name | string, required | This will be the merchant name shown to users when making a purchase via Apple Pay with Touch ID. |
domain | string, required | The domain where the buyer is initiating the payment. |
merchant_identity | string, required | The merchant_identity_id used when registering the business with Apple Pay through our registration API. Source: Log in to Finix Dashboard → Developer → Finix Integration → Merchant Identity ID (e.g. IDmULj61C8ke6Y7qQiKENJ7) |
validation_url | string, required | A validation URL that will be provided by the Apple SDK front-end for every payment. |
curl https://finix.sandbox-payments-api.com/apple_pay_sessions \
    -H "Content-Type: application/json" \
    -H 'Finix-Version: 2022-02-01' \
    -u  USwV2ayDfbTwjUmrftEBKhgk:9bf27419-0ef6-40f5-bce7-3b0eafb1ac88 \
    -d '{
        "display_name": "Finix Test Merchant",
        "domain": "www.finixtestmerchant.com",
        "merchant_identity": "IDmULj61C8ke6Y7qQiKENJ7",
        "validation_url": "https://apple-pay-gateway-cert.apple.com/paymentservices/paymentSession"
}'{
"id": "APPLEPAYSESSION_xxx",
"created_at": "2021-11-22T23:58:19.50Z",
"updated_at": "2021-11-22T23:58:19.50Z",
"session_details": "{\"epochTimestamp\":1640213041060,\"expiresAt\":1640216641060,\"merchantSessionIdentifier\":\"SSH1524BA9006A944B8B9B8FB60227D9990_916523AAED1343F5BC5815E12BEE9250AFFDC1A17C46B0DE5A943F0F94927C24\",\"nonce\":\"a5ee8554\",\"merchantIdentifier\":\"23D5E1F154400B277E14CC8361878AA0AAFD46B2DF74003C7587B256269102BD\",\"domainName\":\"tj.ngrok.io\",\"displayName\":\"Christmas Shopping\",\"signature\":\"...\",\"operationalAnalyticsIdentifier\":\"Christmas Shopping:23D5E1F154400B277E14CC8361878AA0AAFD46B2DF74003C7587B256269102BD\",\"retries\":0}",
"_links": {
"self": {
"href": "https://finix.sandbox-payments-api.com/apple_pay_sessions/APPLEPAYSESSION_xxx"
}
}
}After successful merchant validation, Apple Pay prompts the user for authentication with either Touch ID, Face ID, or device passcode.
When the user authorizes the payment, the onpaymentauthorized function provides an encrypted token, which your app then sends to your backend for processing with Finix. Your backend returns the processing result, which you use to call completePayment() and finalize the Apple Pay session.
var processPayment = function (applePaySession) {
  applePaySession.onpaymentauthorized = function (event) {
    try {
      //token received from Apple
      var paymentToken = event.payment;
      if (paymentToken) {
        console.log("Payment token from Apple: " + paymentToken);
        // extract billing details
        addressData = {
          country: paymentToken.billingContact.countryCode,
          postal_code: paymentToken.billingContact.postalCode,
        };
        name = billingDetails.givenName + " " + billingDetails.familyName;
        // send Finix API stringified form of the isolated token
        var third_party_token = {
          token: paymentToken.token,
        };
        var stringifiedPaymentToken = JSON.stringify(third_party_token);
        // call the server to handle the orchestration of Finix calls
        processPaymentFromServer(stringifiedPaymentToken, addressData, name);
        applePaySession.completePayment(applePaySession.STATUS_SUCCESS);
        console.log(
          "Finix processed transaction successfully with token: " +
            paymentToken,
        );
      } else {
        console.log(
          "Payment token from Apple is null - payment failed to process.",
        );
        applePaySession.completePayment(applePaySession.STATUS_FAILURE);
      }
    } catch (err) {
      console.log(err);
      throw err;
    }
  };
};
Then, your server needs to pass the payment token as a third_party_token, the address data as address, and include the value for name when creating a Payment Instrument.
- Sandbox serverhttps://finix.sandbox-payments-api.com/payment_instruments
curl -i -X POST \
  -u USfdccsr1Z5iVbXDyYt7hjZZ:313636f3-fac2-45a7-bff7-a334b93e7bda \
  https://finix.sandbox-payments-api.com/payment_instruments \
  -H 'Content-Type: application/json' \
  -H 'Finix-Version: 2022-02-01' \
  -d '{
    "address": {
      "city": "San Francisco",
      "country": "USA",
      "line1": "900 Metro Center Blv",
      "line2": "APT 200",
      "postal_code": "94404",
      "region": "CA"
    },
    "identity": "IDmj1yA97RS4rMjiQgvK3Vio",
    "merchant_identity": "IDjvxGeXBLKH1V9YnWm1CS4n",
    "name": "John Smith",
    "third_party_token": "{\"token\":{\"paymentMethod\":{\"network\":\"barcode\",\"type\":\"credit\",\"displayName\":\"\"},\"transactionIdentifier\":\"AE514ADAA44E9C3A0A862C7E4EDEE43C422556FA4748B045F1764860557E8EE6\",\"paymentData\":{\"data\":\"IOg9H5\\/hdpccvHZ03ESJwlJXFlmcnI18WXTSOHOPA82ewYoWVyEMiy63HCsdejXsHIR8a+N\\/5aR24OeJrkxheck2AAl5o1LLJ7jL+75scnf7Z55uQmtVyKITTkH22LrC6E6SgMnXaefJYOTUcG1Veqb\\/dXtpPzqaKACEKDkbVivpDk+A2iX5PLROFTMRgmb9a0HYwHOnVGQzXwiHkX1g6f1R4rILUyMaQ5qLxCplE1t\\/guEYmkGBtOb\\/v8+GRDTl8YrC1tOe\\/cs4aQm4cAKJktFQUTbfAApNFBnKI06mtCM7e7qRna\\/YON3gyci035jA7Zq4kBMo7rQB8puGH6dDqB\\/KsPS6Ps+w688+rqEKz16YUJ\\/LMCOzzBM6bCTOS6eouB1eCh3SJdm\\/lmY=\",\"signature\":\"MIAGCSqGSIb3DQEHAqCAMIACAQExDzANBglghkgBZQMEAgEFADCABgkqhkiG9w0BBwEAAKCAMIID4zCCA4igAwIBAgIITDBBSVGdVDYwCgYIKoZIzj0EAwIwejEuMCwGA1UEAwwlQXBwbGUgQXBwbGljYXRpb24gSW50ZWdyYXRpb24gQ0EgLSBHMzEmMCQGA1UECwwdQXBwbGUgQ2VydGlmaWNhdGlvbiBBdXRob3JpdHkxEzARBgNVBAoMCkFwcGxlIEluYy4xCzAJBgNVBAYTAlVTMB4XDTE5MDUxODAxMzI1N1oXDTI0MDUxNjAxMzI1N1owXzElMCMGA1UEAwwcZWNjLXNtcC1icm9rZXItc2lnbl9VQzQtUFJPRDEUMBIGA1UECwwLaU9TIFN5c3RlbXMxEzARBgNVBAoMCkFwcGxlIEluYy4xCzAJBgNVBAYTAlVTMFkwEwYHKoZIzj0CAQYIKoZIzj0DAQcDQgAEwhV37evWx7Ihj2jdcJChIY3HsL1vLCg9hGCV2Ur0pUEbg0IO2BHzQH6DMx8cVMP36zIg1rrV1O\\/0komJPnwPE6OCAhEwggINMAwGA1UdEwEB\\/wQCMAAwHwYDVR0jBBgwFoAUI\\/JJxE+T5O8n5sT2KGw\\/orv9LkswRQYIKwYBBQUHAQEEOTA3MDUGCCsGAQUFBzABhilodHRwOi8vb2NzcC5hcHBsZS5jb20vb2NzcDA0LWFwcGxlYWljYTMwMjCCAR0GA1UdIASCARQwggEQMIIBDAYJKoZIhvdjZAUBMIH+MIHDBggrBgEFBQcCAjCBtgyBs1JlbGlhbmNlIG9uIHRoaXMgY2VydGlmaWNhdGUgYnkgYW55IHBhcnR5IGFzc3VtZXMgYWNjZXB0YW5jZSBvZiB0aGUgdGhlbiBhcHBsaWNhYmxlIHN0YW5kYXJkIHRlcm1zIGFuZCBjb25kaXRpb25zIG9mIHVzZSwgY2VydGlmaWNhdGUgcG9saWN5IGFuZCBjZXJ0aWZpY2F0aW9uIHByYWN0aWNlIHN0YXRlbWVudHMuMDYGCCsGAQUFBwIBFipodHRwOi8vd3d3LmFwcGxlLmNvbS9jZXJ0aWZpY2F0ZWF1dGhvcml0eS8wNAYDVR0fBC0wKzApoCegJYYjaHR0cDovL2NybC5hcHBsZS5jb20vYXBwbGVhaWNhMy5jcmwwHQYDVR0OBBYEFJRX22\\/VdIGGiYl2L35XhQfnm1gkMA4GA1UdDwEB\\/wQEAwIHgDAPBgkqhkiG92NkBh0EAgUAMAoGCCqGSM49BAMCA0kAMEYCIQC+CVcf5x4ec1tV5a+stMcv60RfMBhSIsclEAK2Hr1vVQIhANGLNQpd1t1usXRgNbEess6Hz6Pmr2y9g4CJDcgs3apjMIIC7jCCAnWgAwIBAgIISW0vvzqY2pcwCgYIKoZIzj0EAwIwZzEbMBkGA1UEAwwSQXBwbGUgUm9vdCBDQSAtIEczMSYwJAYDVQQLDB1BcHBsZSBDZXJ0aWZpY2F0aW9uIEF1dGhvcml0eTETMBEGA1UECgwKQXBwbGUgSW5jLjELMAkGA1UEBhMCVVMwHhcNMTQwNTA2MjM0NjMwWhcNMjkwNTA2MjM0NjMwWjB6MS4wLAYDVQQDDCVBcHBsZSBBcHBsaWNhdGlvbiBJbnRlZ3JhdGlvbiBDQSAtIEczMSYwJAYDVQQLDB1BcHBsZSBDZXJ0aWZpY2F0aW9uIEF1dGhvcml0eTETMBEGA1UECgwKQXBwbGUgSW5jLjELMAkGA1UEBhMCVVMwWTATBgcqhkjOPQIBBggqhkjOPQMBBwNCAATwFxGEGddkhdUaXiWBB3bogKLv3nuuTeCN\\/EuT4TNW1WZbNa4i0Jd2DSJOe7oI\\/XYXzojLdrtmcL7I6CmE\\/1RFo4H3MIH0MEYGCCsGAQUFBwEBBDowODA2BggrBgEFBQcwAYYqaHR0cDovL29jc3AuYXBwbGUuY29tL29jc3AwNC1hcHBsZXJvb3RjYWczMB0GA1UdDgQWBBQj8knET5Pk7yfmxPYobD+iu\\/0uSzAPBgNVHRMBAf8EBTADAQH\\/MB8GA1UdIwQYMBaAFLuw3qFYM4iapIqZ3r6966\\/ayySrMDcGA1UdHwQwMC4wLKAqoCiGJmh0dHA6Ly9jcmwuYXBwbGUuY29tL2FwcGxlcm9vdGNhZzMuY3JsMA4GA1UdDwEB\\/wQEAwIBBjAQBgoqhkiG92NkBgIOBAIFADAKBggqhkjOPQQDAgNnADBkAjA6z3KDURaZsYb7NcNWymK\\/9Bft2Q91TaKOvvGcgV5Ct4n4mPebWZ+Y1UENj53pwv4CMDIt1UQhsKMFd2xd8zg7kGf9F3wsIW2WT8ZyaYISb1T4en0bmcubCYkhYQaZDwmSHQAAMYIBjDCCAYgCAQEwgYYwejEuMCwGA1UEAwwlQXBwbGUgQXBwbGljYXRpb24gSW50ZWdyYXRpb24gQ0EgLSBHMzEmMCQGA1UECwwdQXBwbGUgQ2VydGlmaWNhdGlvbiBBdXRob3JpdHkxEzARBgNVBAoMCkFwcGxlIEluYy4xCzAJBgNVBAYTAlVTAghMMEFJUZ1UNjANBglghkgBZQMEAgEFAKCBlTAYBgkqhkiG9w0BCQMxCwYJKoZIhvcNAQcBMBwGCSqGSIb3DQEJBTEPFw0yMjA0MDExODE2MjJaMCoGCSqGSIb3DQEJNDEdMBswDQYJYIZIAWUDBAIBBQChCgYIKoZIzj0EAwIwLwYJKoZIhvcNAQkEMSIEINpyGxYyGbl1Kj57wU\\/3PijxngHUcidFy9jukG9sccOHMAoGCCqGSM49BAMCBEcwRQIhAPHvbeAIDmJKf2YGS5xcCoySSeCeFf6ThUsKE3UIPWBJAiBQIZZu4wTlZn7R16N+2iTfvuvzJKgeSv8rAs3YM6z56AAAAAAAAA==\",\"header\":{\"publicKeyHash\":\"eOvce9ya55opFC5EXVWlLwzZRVDEY3Hgakf3+C+0zkc=\",\"ephemeralPublicKey\":\"MFkwEwYHKoZIzj0CAQYIKoZIzj0DAQcDQgAE3VnkF5JR9cWuYoeT68dUNp\\/2\\/jGaOiid19UfCV9rEkcPomrzFWEZw\\/dN1uU9RTblnrIQPajFj4R2ZKIpYIlkgA==\",\"transactionId\":\"ae514adaa44e9c3a0a862c7e4edee43c422556fa4748b045f1764860557e8ee6\"},\"version\":\"EC_v1\"}}}",
    "type": "APPLE_PAY"
}'{
"id": "PIwpqpJZCharsZAt6WKVopPS",
"created_at": "2025-05-08T18:44:58.56Z",
"updated_at": "2025-05-08T18:44:58.56Z",
"application": "APc9vhYcPsRuTSpKD9KpMtPe",
"created_via": "API",
"currency": "USD",
"disabled_code": null,
"disabled_message": null,
"enabled": true,
"fingerprint": "FPR88YBDbK4TqYMUNU8t8fbeQ",
"identity": "IDmj1yA97RS4rMjiQgvK3Vio",
"instrument_type": "APPLE_PAY",
"address": {
"line1": "900 Metro Center Blv",
"line2": "APT 200",
"city": "San Francisco",
"region": "CA",
"postal_code": "94404",
"country": "USA"
},
"bin": "370382",
"brand": "AMERICAN_EXPRESS",
"card_type": "CREDIT",
"expiration_month": 11,
"expiration_year": 2024,
"issuer_country": "USA",
"last_four": "8576",
"name": "John Smith",
"tags": {},
"third_party": null,
"third_party_token": null,
"type": "APPLE_PAY",
"_links": {
"self": {
"href": "https://finix.sandbox-payments-api.com/payment_instruments/PIwpqpJZCharsZAt6WKVopPS"
},
"authorizations": {
"href": "https://finix.sandbox-payments-api.com/payment_instruments/PIwpqpJZCharsZAt6WKVopPS/authorizations"
},
"transfers": {
"href": "https://finix.sandbox-payments-api.com/payment_instruments/PIwpqpJZCharsZAt6WKVopPS/transfers"
},
"verifications": {
"href": "https://finix.sandbox-payments-api.com/payment_instruments/PIwpqpJZCharsZAt6WKVopPS/verifications"
},
"application": {
"href": "https://finix.sandbox-payments-api.com/applications/APc9vhYcPsRuTSpKD9KpMtPe"
},
"identity": {
"href": "https://finix.sandbox-payments-api.com/identities/IDmj1yA97RS4rMjiQgvK3Vio"
}
}
}Similar to other Finix transactions, after the Payment Instrument is created, you can use the instrument and create a transfer or an authorization to process transactions.
- Set the
sourceto your Buyer's Payment Instrument ID - Set the
merchantto anAPPROVEDMerchant account - Set the
amountin cents
curl https://finix.sandbox-payments-api.com/transfers \
    -H "Content-Type: application/json" \
    -H 'Finix-Version: 2022-02-01' \
    -u  USsRhsHYZGBPnQw8CByJyEQW:8a14c2f9-d94b-4c72-8f5c-a62908e5b30e \
    -d '{
        "merchant": "MUeDVrf2ahuKc9Eg5TeZugvs",
        "currency": "USD",
        "amount": 662154,
        "source": "PImE5ZhGZJNFy14DtX8wX6f6",
}'{
"id": "TR29av3LN1TAGPbXscsup1tt",
"amount": 662154,
"tags": {},
"state": "SUCCEEDED",
"trace_id": "34f40e87-2599-414b-874b-f472790ff521",
"currency": "USD",
"application": "APgPDQrLD52TYvqazjHJJchM",
"source": "PImE5ZhGZJNFy14DtX8wX6f6",
"destination": null,
"ready_to_settle_at": null,
"externally_funded": "UNKNOWN",
"fee": 0,
"statement_descriptor": "FNX*FINIX FLOWERS",
"type": "DEBIT",
"messages": [],
"raw": null,
"created_at": "2022-08-25T20:39:37.59Z",
"updated_at": "2022-08-25T20:39:38.17Z",
"idempotency_id": null,
"merchant": "MUeDVrf2ahuKc9Eg5TeZugvs",
"merchant_identity": "IDpYDM7J9n57q849o9E9yNrG",
"subtype": "API",
"failure_code": null,
"failure_message": null,
"additional_buyer_charges": null,
"_links": {
"application": {
"href": "https://finix.sandbox-payments-api.com/applications/APgPDQrLD52TYvqazjHJJchM"
},
"self": {
"href": "https://finix.sandbox-payments-api.com/transfers/TR29av3LN1TAGPbXscsup1tt"
},
"merchant_identity": {
"href": "https://finix.sandbox-payments-api.com/identities/IDuqZpDw28f2KK6YuDk4jNLg"
},
"payment_instruments": {
"href": "https://finix.sandbox-payments-api.com/transfers/TR29av3LN1TAGPbXscsup1tt/payment_instruments"
},
"reversals": {
"href": "https://finix.sandbox-payments-api.com/transfers/TR29av3LN1TAGPbXscsup1tt/reversals"
},
"fees": {
"href": "https://finix.sandbox-payments-api.com/transfers/TR29av3LN1TAGPbXscsup1tt/fees"
},
"disputes": {
"href": "https://finix.sandbox-payments-api.com/transfers/TR29av3LN1TAGPbXscsup1tt/disputes"
},
"source": {
"href": "https://finix.sandbox-payments-api.com/payment_instruments/PIe2YvpcjvoVJ6PzoRPBK137"
},
"fee_profile": {
"href": "https://finix.sandbox-payments-api.com/fee_profiles/FPvCQUcnsueN3Bc3zR1qCBG8"
}
}
}You can create an Authorization and capture it later using two separate API calls. This approach is useful if you need to first verify the payment details and then capture a specific amount at a later time. For more details, see Creating and Capturing an Authorization.