Accept Apple Pay in your iOS application using Finix.
This guide details how to get started accepting Apple Pay in an iOS application using the Finix API.
We recommend that you pass the address field listed in the steps below. If the address is not passed, you will be charged additional dues and assessments per transaction from the card network.
Start by familiarizing yourself with the prerequisites for using Apple Pay with Finix.
Before you can begin accepting Apple Pay, you need to first verify and register your application with Apple. You can complete this step with the Finix Dashboard.
If you are a Core customer, instead of Steps 1 or 2 please go to the Application you want to accept Apple Pay.
To register on the Finix Dashboard on the Application Level:
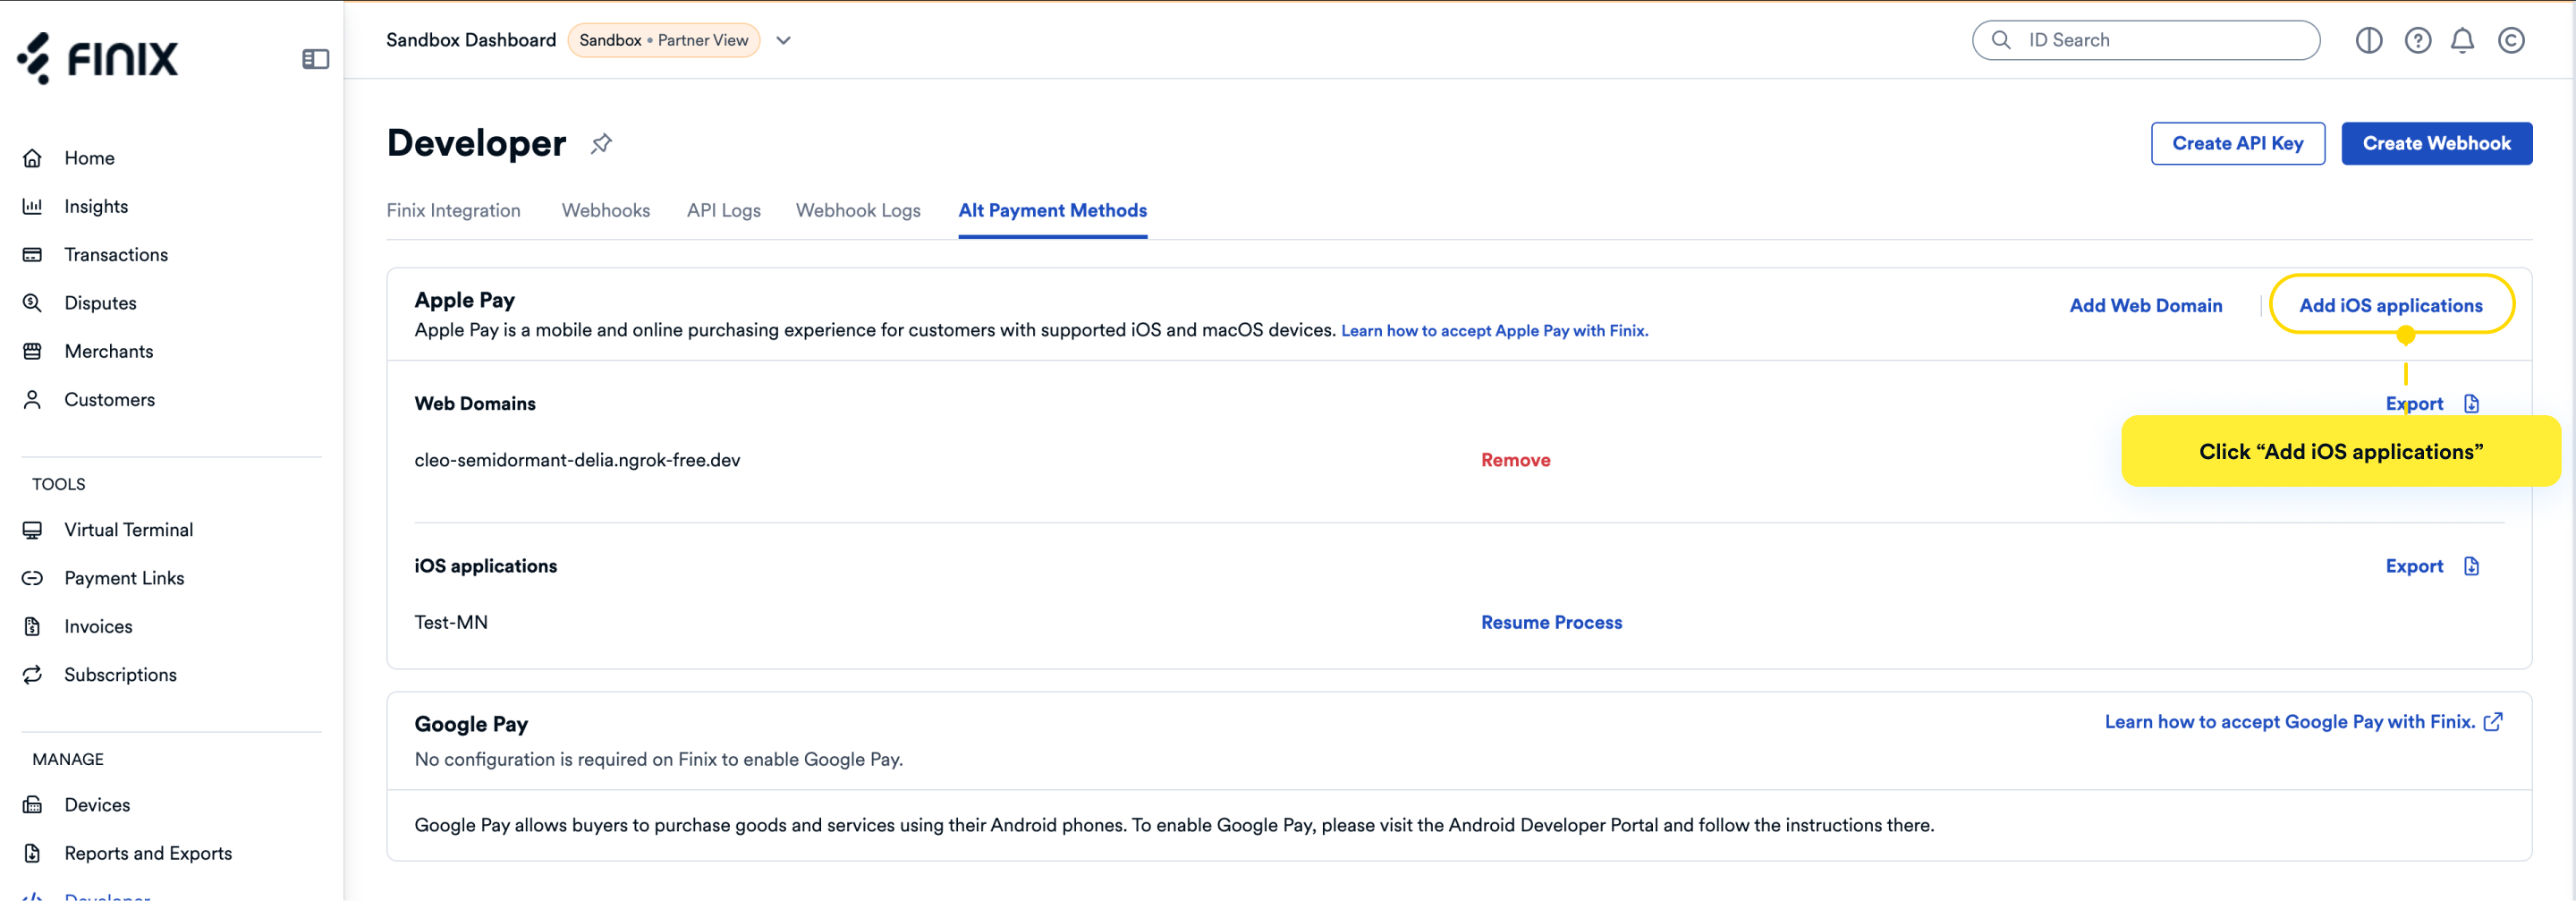
Log in to your Finix Dashboard and click Developer.
Click Alt Payment Methods tab.
Click Add iOS Application and follow the on-screen instructions to create a payment processing certificate.
Enter an iOS application name.
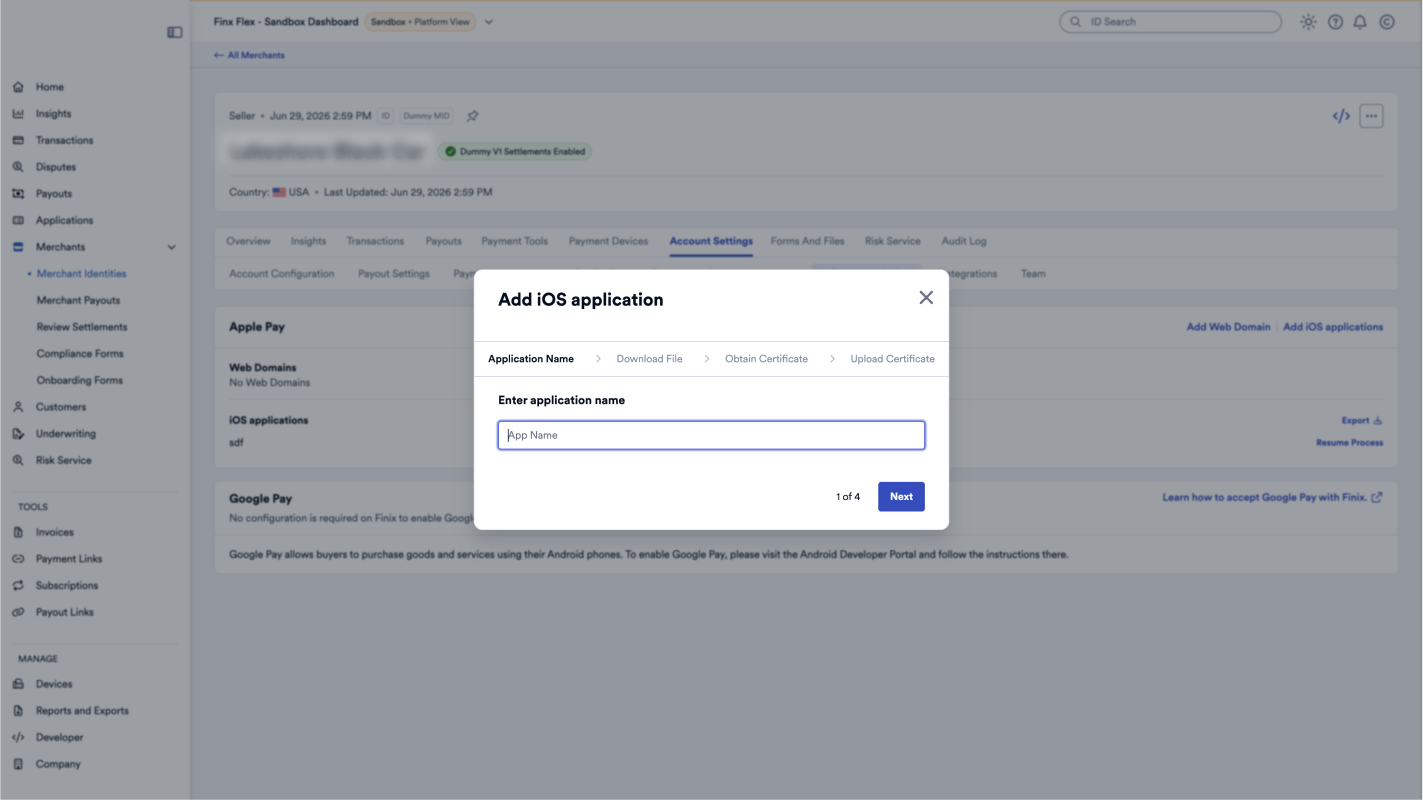
Download the Certificate Signing Request (CSR) file.
 Do not close the modal until you have uploaded the payment processing certificate
You must keep this modal open while you are completing steps 6 through 9 on the Apple Developer Portal.
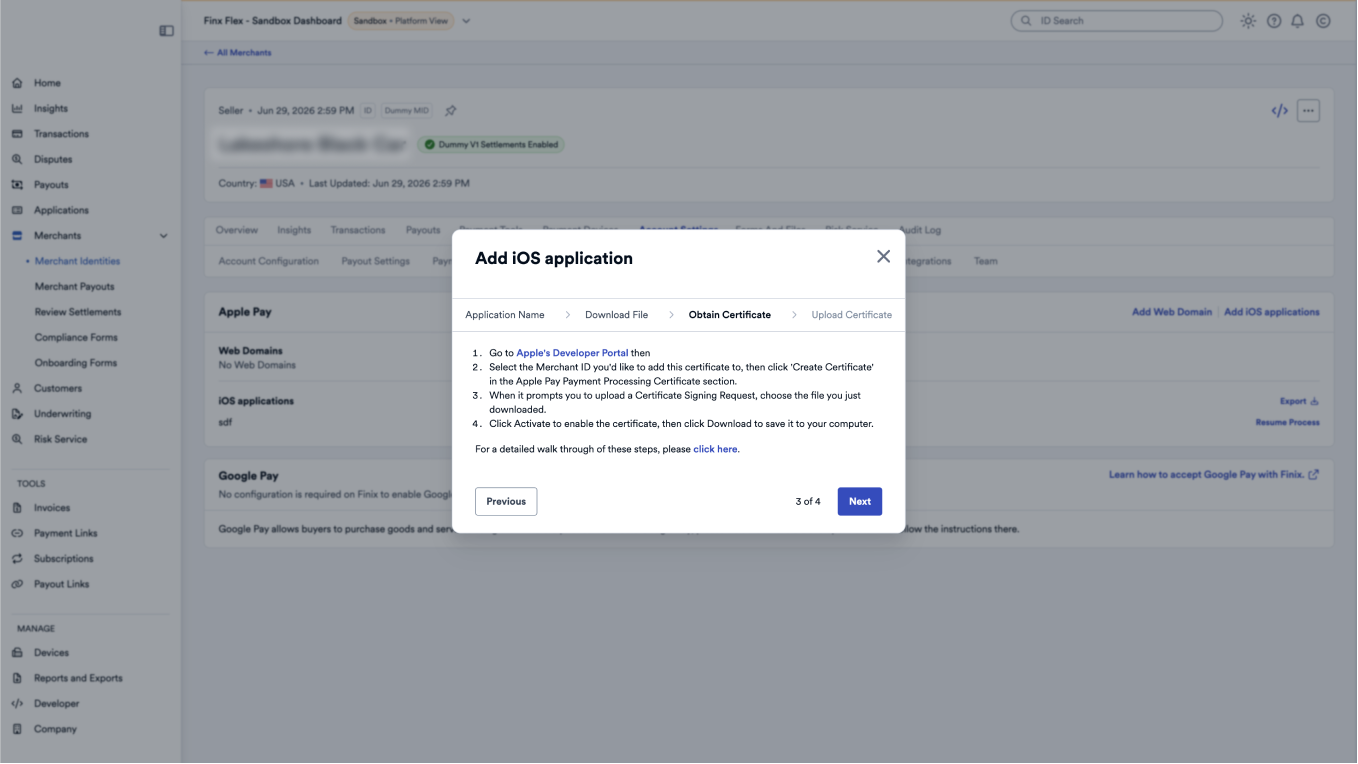
Go to your Apple Developer Portal.
Select the Apple Merchant ID you'd like to add this certificate to, then click 'Create Certificate' in the Apple Pay Payment Processing Certificate section.
When it prompts you to upload a Certificate Signing Request, choose the file you just downloaded in step 2 on the modal.
Click Activate to enable the certificate, then click Download to save it to your computer.
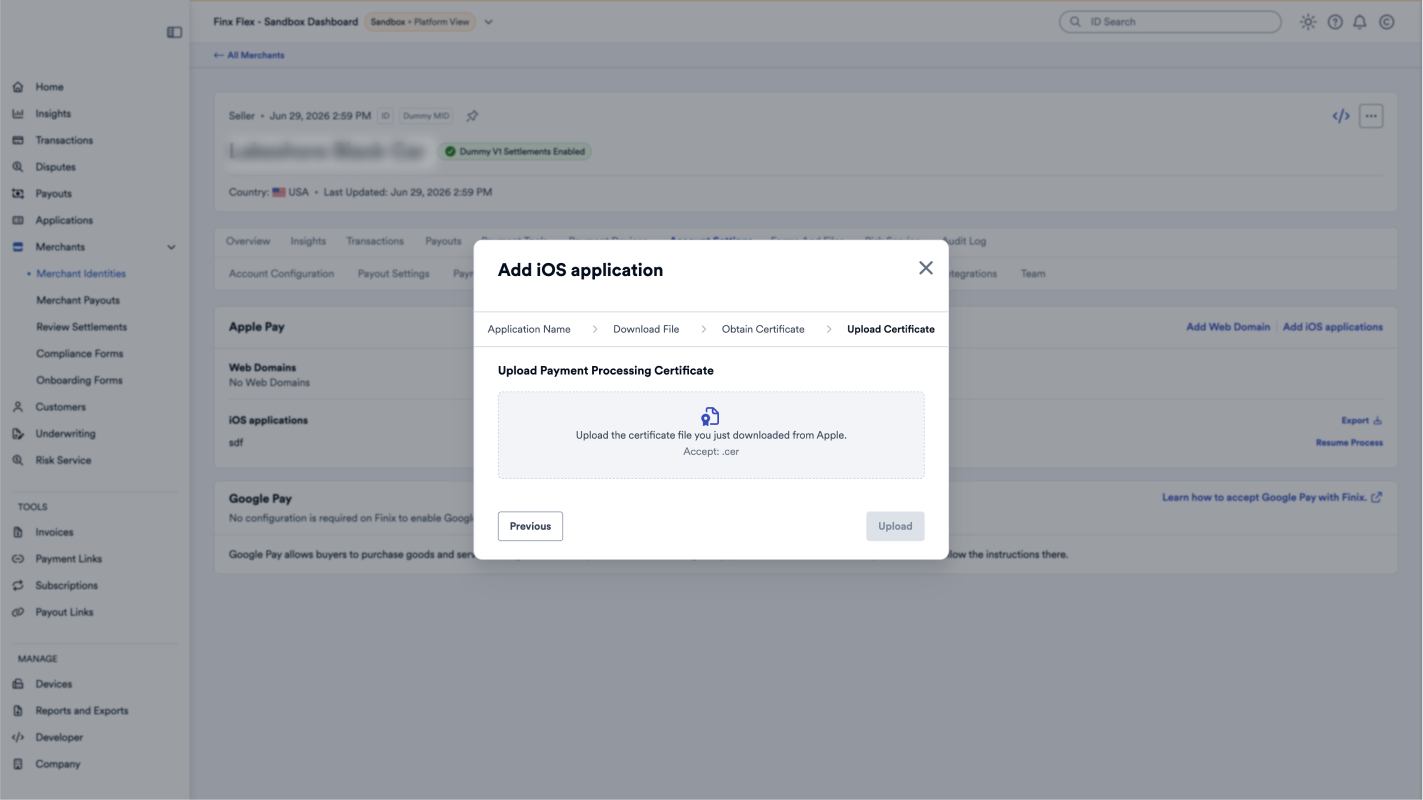
Click Next in the Add iOS Application modal.
Upload the payment processing certificate.
Once your app is registered, it’s authorized to accept Apple Pay payments. You can now add an Apple Pay button to your iOS app’s checkout flow to give customers a seamless payment experience.
When the buyer taps the Apple Pay button, your iOS app creates a payment calling the startPayment method of Apple's PaymentHandler. Ensure to include the requiredBillingContactFields, name and postalAddress to collect billing information.
For full implementations details, see Apple's PassKit documentation.
If address is not collected, fees will apply.
When a buyer authorizes a payment, Apple's completion handler reports the success or failure of the payment. Successful payments return a payment token that you need to include in your request to Finix to create a Payment Instrument.
A buyer identity is required before you can proceed with the next steps. You can either create a new buyer identity through the Finix API, or use an existing one you’ve already created.
All buyer Identity fields are optional. However, Finix recommends including basic information (name, email, address, and phone) to make payment operations easier.
Use an existing buyer
- Log in to your Finix Dashboard.
- In the left sidebar, select Data Resources → Identities.
- Search for the buyer identity you want to use.
- Confirm the Role is Buyer.
- Option to use filters to quickly narrow down results.
- Copy the Buyer Identity (e.g.
IDjWktr7BPDGhz4amrPJZoXg)
Create a new buyer
curl -i -X POST \
  -u USfdccsr1Z5iVbXDyYt7hjZZ:313636f3-fac2-45a7-bff7-a334b93e7bda \
  https://finix.sandbox-payments-api.com/identities \
  -H 'Content-Type: application/json' \
  -H 'Finix-Version: 2022-02-01' \
  -d '{
    "entity": {
      "phone": "7145677613",
      "first_name": "John",
      "last_name": "Smith",
      "email": "finix_example@finix.com",
      "personal_address": {
        "city": "San Mateo",
        "country": "USA",
        "region": "CA",
        "line2": "Apartment 7",
        "line1": "741 Douglass St",
        "postal_code": "94114"
      }
    },
    "identity_roles": [
      "BUYER"
    ],
    "tags": {
      "key": "value"
    },
    "type": "PERSONAL"
}'{
"id": "IDmkDvJfxZWMEK56FDFtbozo",
"created_at": "2024-08-09T09:34:36.87Z",
"updated_at": "2024-08-09T09:34:36.87Z",
"application": "APgPDQrLD52TYvqazjHJJchM",
"entity": {
"ach_max_transaction_amount": 0,
"amex_mid": null,
"annual_card_volume": 0,
"business_address": null,
"business_name": null,
"business_phone": null,
"business_tax_id_provided": false,
"business_type": null,
"default_statement_descriptor": null,
"discover_mid": null,
"dob": null,
"doing_business_as": null,
"email": "finix_example@finix.com",
"first_name": "John",
"has_accepted_credit_cards_previously": false,
"incorporation_date": null,
"last_name": "Smith",
"max_transaction_amount": 0,
"mcc": null,
"ownership_type": null,
"personal_address": {
"line1": "741 Douglass St",
"line2": "Apartment 7",
"city": "San Mateo",
"region": "CA",
"postal_code": "94114",
"country": "USA"
},
"phone": "7145677613",
"principal_percentage_ownership": null,
"short_business_name": null,
"tax_authority": null,
"tax_id_provided": false,
"title": null,
"url": null
},
"identity_roles": [],
"tags": {
"key": "value"
},
"type": "PERSONAL",
"_links": {
"self": {
"href": "https://finix.sandbox-payments-api.com/identities/IDmkDvJfxZWMEK56FDFtbozo"
},
"verifications": {
"href": "https://finix.sandbox-payments-api.com/identities/IDmkDvJfxZWMEK56FDFtbozo/verifications"
},
"merchants": {
"href": "https://finix.sandbox-payments-api.com/identities/IDmkDvJfxZWMEK56FDFtbozo/merchants"
},
"settlements": {
"href": "https://finix.sandbox-payments-api.com/identities/IDmkDvJfxZWMEK56FDFtbozo/settlements"
},
"authorizations": {
"href": "https://finix.sandbox-payments-api.com/identities/IDmkDvJfxZWMEK56FDFtbozo/authorizations"
},
"transfers": {
"href": "https://finix.sandbox-payments-api.com/identities/IDmkDvJfxZWMEK56FDFtbozo/transfers"
},
"payment_instruments": {
"href": "https://finix.sandbox-payments-api.com/identities/IDmkDvJfxZWMEK56FDFtbozo/payment_instruments"
},
"associated_identities": {
"href": "https://finix.sandbox-payments-api.com/identities/IDmkDvJfxZWMEK56FDFtbozo/associated_identities"
},
"disputes": {
"href": "https://finix.sandbox-payments-api.com/identities/IDmkDvJfxZWMEK56FDFtbozo/disputes"
},
"application": {
"href": "https://finix.sandbox-payments-api.com/applications/APgPDQrLD52TYvqazjHJJchM"
}
}
}After creating a payment with Apple, use the payment token that's returned to create a Payment Instrument with Finix.
Your app needs to send the payment token and billing address (returned from Apple's completion handler) to Finix as the third_party_token, name, and address fields when creating the Payment Instrument.
- Sandbox serverhttps://finix.sandbox-payments-api.com/payment_instruments
curl -i -X POST \
  -u USfdccsr1Z5iVbXDyYt7hjZZ:313636f3-fac2-45a7-bff7-a334b93e7bda \
  https://finix.sandbox-payments-api.com/payment_instruments \
  -H 'Content-Type: application/json' \
  -H 'Finix-Version: 2022-02-01' \
  -d '{
    "address": {
      "city": "San Francisco",
      "country": "USA",
      "line1": "900 Metro Center Blv",
      "line2": "APT 200",
      "postal_code": "94404",
      "region": "CA"
    },
    "identity": "IDmj1yA97RS4rMjiQgvK3Vio",
    "merchant_identity": "IDjvxGeXBLKH1V9YnWm1CS4n",
    "name": "John Smith",
    "third_party_token": "{\"token\":{\"paymentMethod\":{\"network\":\"barcode\",\"type\":\"credit\",\"displayName\":\"\"},\"transactionIdentifier\":\"AE514ADAA44E9C3A0A862C7E4EDEE43C422556FA4748B045F1764860557E8EE6\",\"paymentData\":{\"data\":\"IOg9H5\\/hdpccvHZ03ESJwlJXFlmcnI18WXTSOHOPA82ewYoWVyEMiy63HCsdejXsHIR8a+N\\/5aR24OeJrkxheck2AAl5o1LLJ7jL+75scnf7Z55uQmtVyKITTkH22LrC6E6SgMnXaefJYOTUcG1Veqb\\/dXtpPzqaKACEKDkbVivpDk+A2iX5PLROFTMRgmb9a0HYwHOnVGQzXwiHkX1g6f1R4rILUyMaQ5qLxCplE1t\\/guEYmkGBtOb\\/v8+GRDTl8YrC1tOe\\/cs4aQm4cAKJktFQUTbfAApNFBnKI06mtCM7e7qRna\\/YON3gyci035jA7Zq4kBMo7rQB8puGH6dDqB\\/KsPS6Ps+w688+rqEKz16YUJ\\/LMCOzzBM6bCTOS6eouB1eCh3SJdm\\/lmY=\",\"signature\":\"MIAGCSqGSIb3DQEHAqCAMIACAQExDzANBglghkgBZQMEAgEFADCABgkqhkiG9w0BBwEAAKCAMIID4zCCA4igAwIBAgIITDBBSVGdVDYwCgYIKoZIzj0EAwIwejEuMCwGA1UEAwwlQXBwbGUgQXBwbGljYXRpb24gSW50ZWdyYXRpb24gQ0EgLSBHMzEmMCQGA1UECwwdQXBwbGUgQ2VydGlmaWNhdGlvbiBBdXRob3JpdHkxEzARBgNVBAoMCkFwcGxlIEluYy4xCzAJBgNVBAYTAlVTMB4XDTE5MDUxODAxMzI1N1oXDTI0MDUxNjAxMzI1N1owXzElMCMGA1UEAwwcZWNjLXNtcC1icm9rZXItc2lnbl9VQzQtUFJPRDEUMBIGA1UECwwLaU9TIFN5c3RlbXMxEzARBgNVBAoMCkFwcGxlIEluYy4xCzAJBgNVBAYTAlVTMFkwEwYHKoZIzj0CAQYIKoZIzj0DAQcDQgAEwhV37evWx7Ihj2jdcJChIY3HsL1vLCg9hGCV2Ur0pUEbg0IO2BHzQH6DMx8cVMP36zIg1rrV1O\\/0komJPnwPE6OCAhEwggINMAwGA1UdEwEB\\/wQCMAAwHwYDVR0jBBgwFoAUI\\/JJxE+T5O8n5sT2KGw\\/orv9LkswRQYIKwYBBQUHAQEEOTA3MDUGCCsGAQUFBzABhilodHRwOi8vb2NzcC5hcHBsZS5jb20vb2NzcDA0LWFwcGxlYWljYTMwMjCCAR0GA1UdIASCARQwggEQMIIBDAYJKoZIhvdjZAUBMIH+MIHDBggrBgEFBQcCAjCBtgyBs1JlbGlhbmNlIG9uIHRoaXMgY2VydGlmaWNhdGUgYnkgYW55IHBhcnR5IGFzc3VtZXMgYWNjZXB0YW5jZSBvZiB0aGUgdGhlbiBhcHBsaWNhYmxlIHN0YW5kYXJkIHRlcm1zIGFuZCBjb25kaXRpb25zIG9mIHVzZSwgY2VydGlmaWNhdGUgcG9saWN5IGFuZCBjZXJ0aWZpY2F0aW9uIHByYWN0aWNlIHN0YXRlbWVudHMuMDYGCCsGAQUFBwIBFipodHRwOi8vd3d3LmFwcGxlLmNvbS9jZXJ0aWZpY2F0ZWF1dGhvcml0eS8wNAYDVR0fBC0wKzApoCegJYYjaHR0cDovL2NybC5hcHBsZS5jb20vYXBwbGVhaWNhMy5jcmwwHQYDVR0OBBYEFJRX22\\/VdIGGiYl2L35XhQfnm1gkMA4GA1UdDwEB\\/wQEAwIHgDAPBgkqhkiG92NkBh0EAgUAMAoGCCqGSM49BAMCA0kAMEYCIQC+CVcf5x4ec1tV5a+stMcv60RfMBhSIsclEAK2Hr1vVQIhANGLNQpd1t1usXRgNbEess6Hz6Pmr2y9g4CJDcgs3apjMIIC7jCCAnWgAwIBAgIISW0vvzqY2pcwCgYIKoZIzj0EAwIwZzEbMBkGA1UEAwwSQXBwbGUgUm9vdCBDQSAtIEczMSYwJAYDVQQLDB1BcHBsZSBDZXJ0aWZpY2F0aW9uIEF1dGhvcml0eTETMBEGA1UECgwKQXBwbGUgSW5jLjELMAkGA1UEBhMCVVMwHhcNMTQwNTA2MjM0NjMwWhcNMjkwNTA2MjM0NjMwWjB6MS4wLAYDVQQDDCVBcHBsZSBBcHBsaWNhdGlvbiBJbnRlZ3JhdGlvbiBDQSAtIEczMSYwJAYDVQQLDB1BcHBsZSBDZXJ0aWZpY2F0aW9uIEF1dGhvcml0eTETMBEGA1UECgwKQXBwbGUgSW5jLjELMAkGA1UEBhMCVVMwWTATBgcqhkjOPQIBBggqhkjOPQMBBwNCAATwFxGEGddkhdUaXiWBB3bogKLv3nuuTeCN\\/EuT4TNW1WZbNa4i0Jd2DSJOe7oI\\/XYXzojLdrtmcL7I6CmE\\/1RFo4H3MIH0MEYGCCsGAQUFBwEBBDowODA2BggrBgEFBQcwAYYqaHR0cDovL29jc3AuYXBwbGUuY29tL29jc3AwNC1hcHBsZXJvb3RjYWczMB0GA1UdDgQWBBQj8knET5Pk7yfmxPYobD+iu\\/0uSzAPBgNVHRMBAf8EBTADAQH\\/MB8GA1UdIwQYMBaAFLuw3qFYM4iapIqZ3r6966\\/ayySrMDcGA1UdHwQwMC4wLKAqoCiGJmh0dHA6Ly9jcmwuYXBwbGUuY29tL2FwcGxlcm9vdGNhZzMuY3JsMA4GA1UdDwEB\\/wQEAwIBBjAQBgoqhkiG92NkBgIOBAIFADAKBggqhkjOPQQDAgNnADBkAjA6z3KDURaZsYb7NcNWymK\\/9Bft2Q91TaKOvvGcgV5Ct4n4mPebWZ+Y1UENj53pwv4CMDIt1UQhsKMFd2xd8zg7kGf9F3wsIW2WT8ZyaYISb1T4en0bmcubCYkhYQaZDwmSHQAAMYIBjDCCAYgCAQEwgYYwejEuMCwGA1UEAwwlQXBwbGUgQXBwbGljYXRpb24gSW50ZWdyYXRpb24gQ0EgLSBHMzEmMCQGA1UECwwdQXBwbGUgQ2VydGlmaWNhdGlvbiBBdXRob3JpdHkxEzARBgNVBAoMCkFwcGxlIEluYy4xCzAJBgNVBAYTAlVTAghMMEFJUZ1UNjANBglghkgBZQMEAgEFAKCBlTAYBgkqhkiG9w0BCQMxCwYJKoZIhvcNAQcBMBwGCSqGSIb3DQEJBTEPFw0yMjA0MDExODE2MjJaMCoGCSqGSIb3DQEJNDEdMBswDQYJYIZIAWUDBAIBBQChCgYIKoZIzj0EAwIwLwYJKoZIhvcNAQkEMSIEINpyGxYyGbl1Kj57wU\\/3PijxngHUcidFy9jukG9sccOHMAoGCCqGSM49BAMCBEcwRQIhAPHvbeAIDmJKf2YGS5xcCoySSeCeFf6ThUsKE3UIPWBJAiBQIZZu4wTlZn7R16N+2iTfvuvzJKgeSv8rAs3YM6z56AAAAAAAAA==\",\"header\":{\"publicKeyHash\":\"eOvce9ya55opFC5EXVWlLwzZRVDEY3Hgakf3+C+0zkc=\",\"ephemeralPublicKey\":\"MFkwEwYHKoZIzj0CAQYIKoZIzj0DAQcDQgAE3VnkF5JR9cWuYoeT68dUNp\\/2\\/jGaOiid19UfCV9rEkcPomrzFWEZw\\/dN1uU9RTblnrIQPajFj4R2ZKIpYIlkgA==\",\"transactionId\":\"ae514adaa44e9c3a0a862c7e4edee43c422556fa4748b045f1764860557e8ee6\"},\"version\":\"EC_v1\"}}}",
    "type": "APPLE_PAY"
}'{
"id": "PIwpqpJZCharsZAt6WKVopPS",
"created_at": "2025-05-08T18:44:58.56Z",
"updated_at": "2025-05-08T18:44:58.56Z",
"application": "APc9vhYcPsRuTSpKD9KpMtPe",
"created_via": "API",
"currency": "USD",
"disabled_code": null,
"disabled_message": null,
"enabled": true,
"fingerprint": "FPR88YBDbK4TqYMUNU8t8fbeQ",
"identity": "IDmj1yA97RS4rMjiQgvK3Vio",
"instrument_type": "APPLE_PAY",
"address": {
"line1": "900 Metro Center Blv",
"line2": "APT 200",
"city": "San Francisco",
"region": "CA",
"postal_code": "94404",
"country": "USA"
},
"bin": "370382",
"brand": "AMERICAN_EXPRESS",
"card_type": "CREDIT",
"expiration_month": 11,
"expiration_year": 2024,
"issuer_country": "USA",
"last_four": "8576",
"name": "John Smith",
"tags": {},
"third_party": null,
"third_party_token": null,
"type": "APPLE_PAY",
"_links": {
"self": {
"href": "https://finix.sandbox-payments-api.com/payment_instruments/PIwpqpJZCharsZAt6WKVopPS"
},
"authorizations": {
"href": "https://finix.sandbox-payments-api.com/payment_instruments/PIwpqpJZCharsZAt6WKVopPS/authorizations"
},
"transfers": {
"href": "https://finix.sandbox-payments-api.com/payment_instruments/PIwpqpJZCharsZAt6WKVopPS/transfers"
},
"verifications": {
"href": "https://finix.sandbox-payments-api.com/payment_instruments/PIwpqpJZCharsZAt6WKVopPS/verifications"
},
"application": {
"href": "https://finix.sandbox-payments-api.com/applications/APc9vhYcPsRuTSpKD9KpMtPe"
},
"identity": {
"href": "https://finix.sandbox-payments-api.com/identities/IDmj1yA97RS4rMjiQgvK3Vio"
}
}
}Similar to other Finix transactions, after the Payment Instrument is created, you can use the instrument and create a transfer or an authorization to process transactions.
- Set the
sourceto your Buyer's Payment Instrument ID - Set the
merchantto anAPPROVEDMerchant account - Set the
amountin cents
curl https://finix.sandbox-payments-api.com/transfers \
    -H "Content-Type: application/json" \
    -H 'Finix-Version: 2022-02-01' \
    -u  USsRhsHYZGBPnQw8CByJyEQW:8a14c2f9-d94b-4c72-8f5c-a62908e5b30e \
    -d '{
        "merchant": "MUeDVrf2ahuKc9Eg5TeZugvs",
        "currency": "USD",
        "amount": 662154,
        "source": "PImE5ZhGZJNFy14DtX8wX6f6",
}'{
"id": "TR29av3LN1TAGPbXscsup1tt",
"amount": 662154,
"tags": {},
"state": "SUCCEEDED",
"trace_id": "34f40e87-2599-414b-874b-f472790ff521",
"currency": "USD",
"application": "APgPDQrLD52TYvqazjHJJchM",
"source": "PImE5ZhGZJNFy14DtX8wX6f6",
"destination": null,
"ready_to_settle_at": null,
"externally_funded": "UNKNOWN",
"fee": 0,
"statement_descriptor": "FNX*FINIX FLOWERS",
"type": "DEBIT",
"messages": [],
"raw": null,
"created_at": "2022-08-25T20:39:37.59Z",
"updated_at": "2022-08-25T20:39:38.17Z",
"idempotency_id": null,
"merchant": "MUeDVrf2ahuKc9Eg5TeZugvs",
"merchant_identity": "IDpYDM7J9n57q849o9E9yNrG",
"subtype": "API",
"failure_code": null,
"failure_message": null,
"additional_buyer_charges": null,
"_links": {
"application": {
"href": "https://finix.sandbox-payments-api.com/applications/APgPDQrLD52TYvqazjHJJchM"
},
"self": {
"href": "https://finix.sandbox-payments-api.com/transfers/TR29av3LN1TAGPbXscsup1tt"
},
"merchant_identity": {
"href": "https://finix.sandbox-payments-api.com/identities/IDuqZpDw28f2KK6YuDk4jNLg"
},
"payment_instruments": {
"href": "https://finix.sandbox-payments-api.com/transfers/TR29av3LN1TAGPbXscsup1tt/payment_instruments"
},
"reversals": {
"href": "https://finix.sandbox-payments-api.com/transfers/TR29av3LN1TAGPbXscsup1tt/reversals"
},
"fees": {
"href": "https://finix.sandbox-payments-api.com/transfers/TR29av3LN1TAGPbXscsup1tt/fees"
},
"disputes": {
"href": "https://finix.sandbox-payments-api.com/transfers/TR29av3LN1TAGPbXscsup1tt/disputes"
},
"source": {
"href": "https://finix.sandbox-payments-api.com/payment_instruments/PIe2YvpcjvoVJ6PzoRPBK137"
},
"fee_profile": {
"href": "https://finix.sandbox-payments-api.com/fee_profiles/FPvCQUcnsueN3Bc3zR1qCBG8"
}
}
}You can create an Authorization and capture it later using two separate API calls. This approach is useful if you need to first verify the payment details and then capture a specific amount at a later time. For more details, see Creating and Capturing an Authorization.