
Use Tokenization Forms to collect and tokenize the payment details of buyers. Our Tokenization Form offers a low-code solution to easily take in credit card and bank data and tokenize in a PCI-compliant way.
Finix’s Tokenization Forms provide flexible customization options, including the ability to:
- Show and hide specific fields
- Customize labels and placeholder text
- Modify error messages to match your brand's voice
- Control input styling both inside and outside the iframe
- Accept both card and ACH payment methods in a single form
- Use custom fonts within the embedded iframe
- Pre-fill values for select fields
- Manage multiple forms on the same page simultaneously
The primary method for creating a Tokenization Form is Finix.PaymentForm. Use the paymentMethods option to control which payment types to accept:
| Payment Methods Option | Description |
|---|---|
["card", "bank"] | Accept both card and bank accounts (default) |
["card"] | Accept only credit or debit cards |
["bank"] | Accept only bank accounts (USA and CAN) |
Every Tokenization Form uses a versioned finix.js JavaScript library to secure sensitive card and bank account data. Having buyers input their data into a Tokenization Form prevents third parties from accessing the submitted information.
Once initialized, the library communicates the state of the form through a JavaScript callback. The state object includes logic that validates the payment details submitted by the buyer.
First, we'll need to add the finix.js library to the webpage hosting the form that collects payment details.
To add the library, include the following the script:
<script src="https://js.finix.com/v/2/finix.js"></script>To remain compliant with security standards, the library should always be loaded directly from https://js.finix.com and should never be self hosted or included in your own code bundle.
To best leverage the Finix library's built in fraud detection capabilities, include the script on every page, not just the checkout page. This allows Finix to monitor and detect potential malicious behavior that may be indicative of fraud.
Use the Finix.PaymentForm function to create an instance of the Finix object and automatically render the payment form into your desired location:
Finix.PaymentForm(element, environment, application, options);| Parameter | Type | Required | Description |
|---|---|---|---|
element | string or HTMLElement | Yes | The location in your website where you want to load the payment form. This can either be a string of the ID of the element or a direct reference to the HTML Element object itself. When using a string, the element must have the exact matching id attribute (class references are not supported). |
environment | string | Yes | The environment to use. Must match the environment of the Application ID. Supported values: sandbox, prod. |
application | string | Yes | Your Application ID assigned by Finix when you create your account. Applications can exist in both Sandbox and Prod environments. |
options | object | No | An optional object to customize the Payment Form. See below for available options. |
The following methods are deprecated and should be replaced with Finix.PaymentForm:
Finix.TokenForm→ UsePaymentFormwithpaymentMethods: ["card", "bank"]Finix.CardTokenForm→ UsePaymentFormwithpaymentMethods: ["card"]Finix.BankTokenForm→ UsePaymentFormwithpaymentMethods: ["bank"]
See Migrating from V1 to V2 for migration instructions.
Next, define and customize what exact fields will be included and required in the Tokenization Form.
Requesting an address in your Tokenization Form can lower interchange on credit card transactions.
Aspects of the input fields you can change include:
| Field | Type | Description |
|---|---|---|
paymentMethods | array[string] | Specify which payment methods to allow. Options: ["card", "bank"], ["card"], or ["bank"]. Defaults to ["card", "bank"]. |
showAddress | boolean | Show address fields in the form (defaults to false). To require specific address fields, use requiredFields. |
showLabels | boolean | Show labels in the form (defaults to true). |
labels | object | Set custom labels for each field. |
showPlaceholders | boolean | Turn on or off placeholder text in the fields (defaults to true). |
placeholders | object | Set custom placeholders for each field. |
hideFields | array[string] | Specify which fields to hide. Not all fields can be hidden as some are required by networks. |
requiredFields | array[string] | Require any specific fields that are not required by default. |
requireSecurityCode | boolean | Set whether to require security code (CCV/CVV) for card information (defaults to true). |
confirmAccountNumber | boolean | Show a double confirmation input for bank account numbers to validate both entries match (defaults to true). |
hidePotentialIssueMessages | boolean | Hide warning messages for non-standard but valid card numbers (defaults to true). |
hideErrorMessages | boolean | If you want to require a field, but not hide input error messages (defaults to false). |
errorMessages | object | Set custom error messages for each field if you are showing error messages. |
defaultValues | object | Set default values for each field. Cannot pre-fill card or bank information due to PCI compliance. |
fonts | array[object] | Set custom fonts to be used inside the form inputs. |
enableDarkMode | boolean | Enable dark mode styling for the payment form to match dark-themed websites (defaults to false). Further customization available in styles. |
theme | string | Set the visual theme of the form. Options: finix, amethyst, sapphire, topaz, ruby, emerald, midnight, elevated. Defaults to finix. |
plaidLinkSettings | object | Configure Plaid bank account settings. See below for supported fields. |
onLoad | function | Callback function that triggers once the Payment Form iframe has completed initialization. |
onUpdate | function | Callback function that triggers every time the form state changes. Returns (state, binInformation, hasErrors). |
onSubmit | function | Callback function for form submission. Returns (error, response). When provided, automatically creates a submit button. |
submitLabel | string | Text used for the automatically generated submit button (when auto-submit behavior is used). Defaults to a generic label; override to match your checkout copy (e.g., "Pay Now" or "Add Payment Method"). |
For labels, placeholders, hideFields, requiredFields, errorMessages, and defaultValues, the following field IDs are supported:
- Card fields:
card_holder_name,number,expiration_date,security_code - Bank fields:
account_holder_name,account_number,bank_code,account_type - Address fields:
address_line1,address_line2,address_city,address_region,address_postal_code,address_country
Not all field IDs are supported for every option. For example, hideFields does not support hiding number or expiration_date as these are required by networks. The defaultValues option cannot pre-fill number, expiration_date, security_code, account_number, bank_code, institution_number, or transit_number due to PCI compliance.
The plaidLinkSettings object supports the following fields:
| Field | Type | Description |
|---|---|---|
displayName | string | The name shown at the top of the Plaid modal. Defaults to your application name. |
language | string | The language for the Plaid link experience (defaults to "en"). |
countries | array[string] | ISO-3 country codes defining which banks appear in the search (defaults to ["USA", "CAN"]). |
Example:
plaidLinkSettings: {
  displayName: "Finix Test Merchant",
  language: "en",
  countries: ["USA", "CAN"],
}onLoad - Triggers once when the Payment Form iframe has completed initialization. Takes no parameters.
onLoad: function () {
  console.log("Payment form loaded");
}
onUpdate - Triggers every time the form state changes. Returns three parameters:
state- Object showing form state including metadata like which inputs are valid, dirty, or pristine (does not expose PI data)binInformation- Object with high-level BIN data such as BIN number and card brandhasErrors- Boolean indicating if the form currently has errors (useful for enabling/disabling custom submit buttons)
onUpdate: function (state, binInformation, hasErrors) {
  console.log("Form state:", state);
  console.log("BIN info:", binInformation);
  console.log("Has errors:", hasErrors);
}
onSubmit - Triggers when the form is submitted. Returns two parameters:
error- Error object if submission failed,nullotherwiseresponse- Response object containing the token data on success
onSubmit: function (error, response) {
  if (error) {
    console.error("Tokenization error:", error);
    return;
  }
  const token = response?.data?.id;
  console.log("Token ID:", token);
}We highly recommend using the onSubmit callback rather than manually calling submit. It simplifies the integration by automatically handling submit button enabling/disabling based on form errors. If you don't use onSubmit, you'll need to create your own button, handle enabling/disabling based on hasErrors from onUpdate, and manually call the submit function.
Style the Tokenization Form using the styles option. Styles are organized by theme (default or dark), then by target element, then by state.
styles: {
  default: { /* base (light) theme */ },
  dark:    { /* optional dark mode overrides */ }
}
Available targets and states:
| Target | Supported States | Description |
|---|---|---|
form | default | Form global styling. |
section | default | Each section wrapper (card, bank, or address). |
sectionHeader | default, focused | Section heading text. focused applies when a field inside the section is focused. |
input | default, success, error, focused | All input fields. success applies when the input has a valid value. error applies when the input has a validation error and showErrors is true. focused applies while the input is focused. |
submitButton | default, disabled | Built-in submit button. disabled applies when the form has errors. |
Style values are plain CSS-in-JS objects. For example:
styles: {
  default: {
    input: {
      default: { border: "1px solid #ccc", borderRadius: "8px" },
      error:   { border: "1px solid red" },
    },
    submitButton: {
      disabled: { opacity: 0.5 },
    },
  },
}
For full details including dark mode and available CSS properties, see Styles & Fonts.
Configure what happens when the buyer submits the form. There are two approaches:
Add the onSubmit callback to your options object. This automatically creates a submit button and handles enabling/disabling based on form validation:
Finix.PaymentForm(
  "form-element",
  "sandbox",
  "APgPDQrLD52TYvqazjHJJchM",
  {
    onSubmit: function (error, response) {
      if (error) {
        console.error("Tokenization error:", error);
        return;
      }
      const tokenData = response.data || {};
      const token = tokenData.id;
      // Use the token to create a payment instrument
    },
  }
);If you need a custom submit button, use the onUpdate callback to track form errors and call form.submit() manually:
const submitButton = document.getElementById("submit");

const form = Finix.PaymentForm(
  "form-element",
  "sandbox",
  "APgPDQrLD52TYvqazjHJJchM",
  {
    onUpdate: function (state, binInformation, hasErrors) {
      submitButton.disabled = hasErrors;
    },
  }
);

submitButton.addEventListener("click", function () {
  form.submit(function (error, response) {
    if (error) {
      console.error("Tokenization error:", error);
      return;
    }
    const tokenData = response.data || {};
    const token = tokenData.id;
    // Use the token to create a payment instrument
  });
});| Field | Type | Description |
|---|---|---|
error | object | Error object if submission failed, null otherwise. |
response | object | Response object containing the token data on success. |
Finix will return back a token with a prefix of TK.
{
"id" : "TKeD6uad8xZc52Rqg1VhvSBw",
"created_at" : "2025-06-10T00:31:53.54Z",
"updated_at" : "2025-06-10T00:31:53.54Z",
"currency" : "USD",
"expires_at" : "2025-06-11T00:31:53.54Z",
"fingerprint" : "FPRrcobjtdU98gr4sjiqYR1Qg",
"instrument_type" : "PAYMENT_CARD"
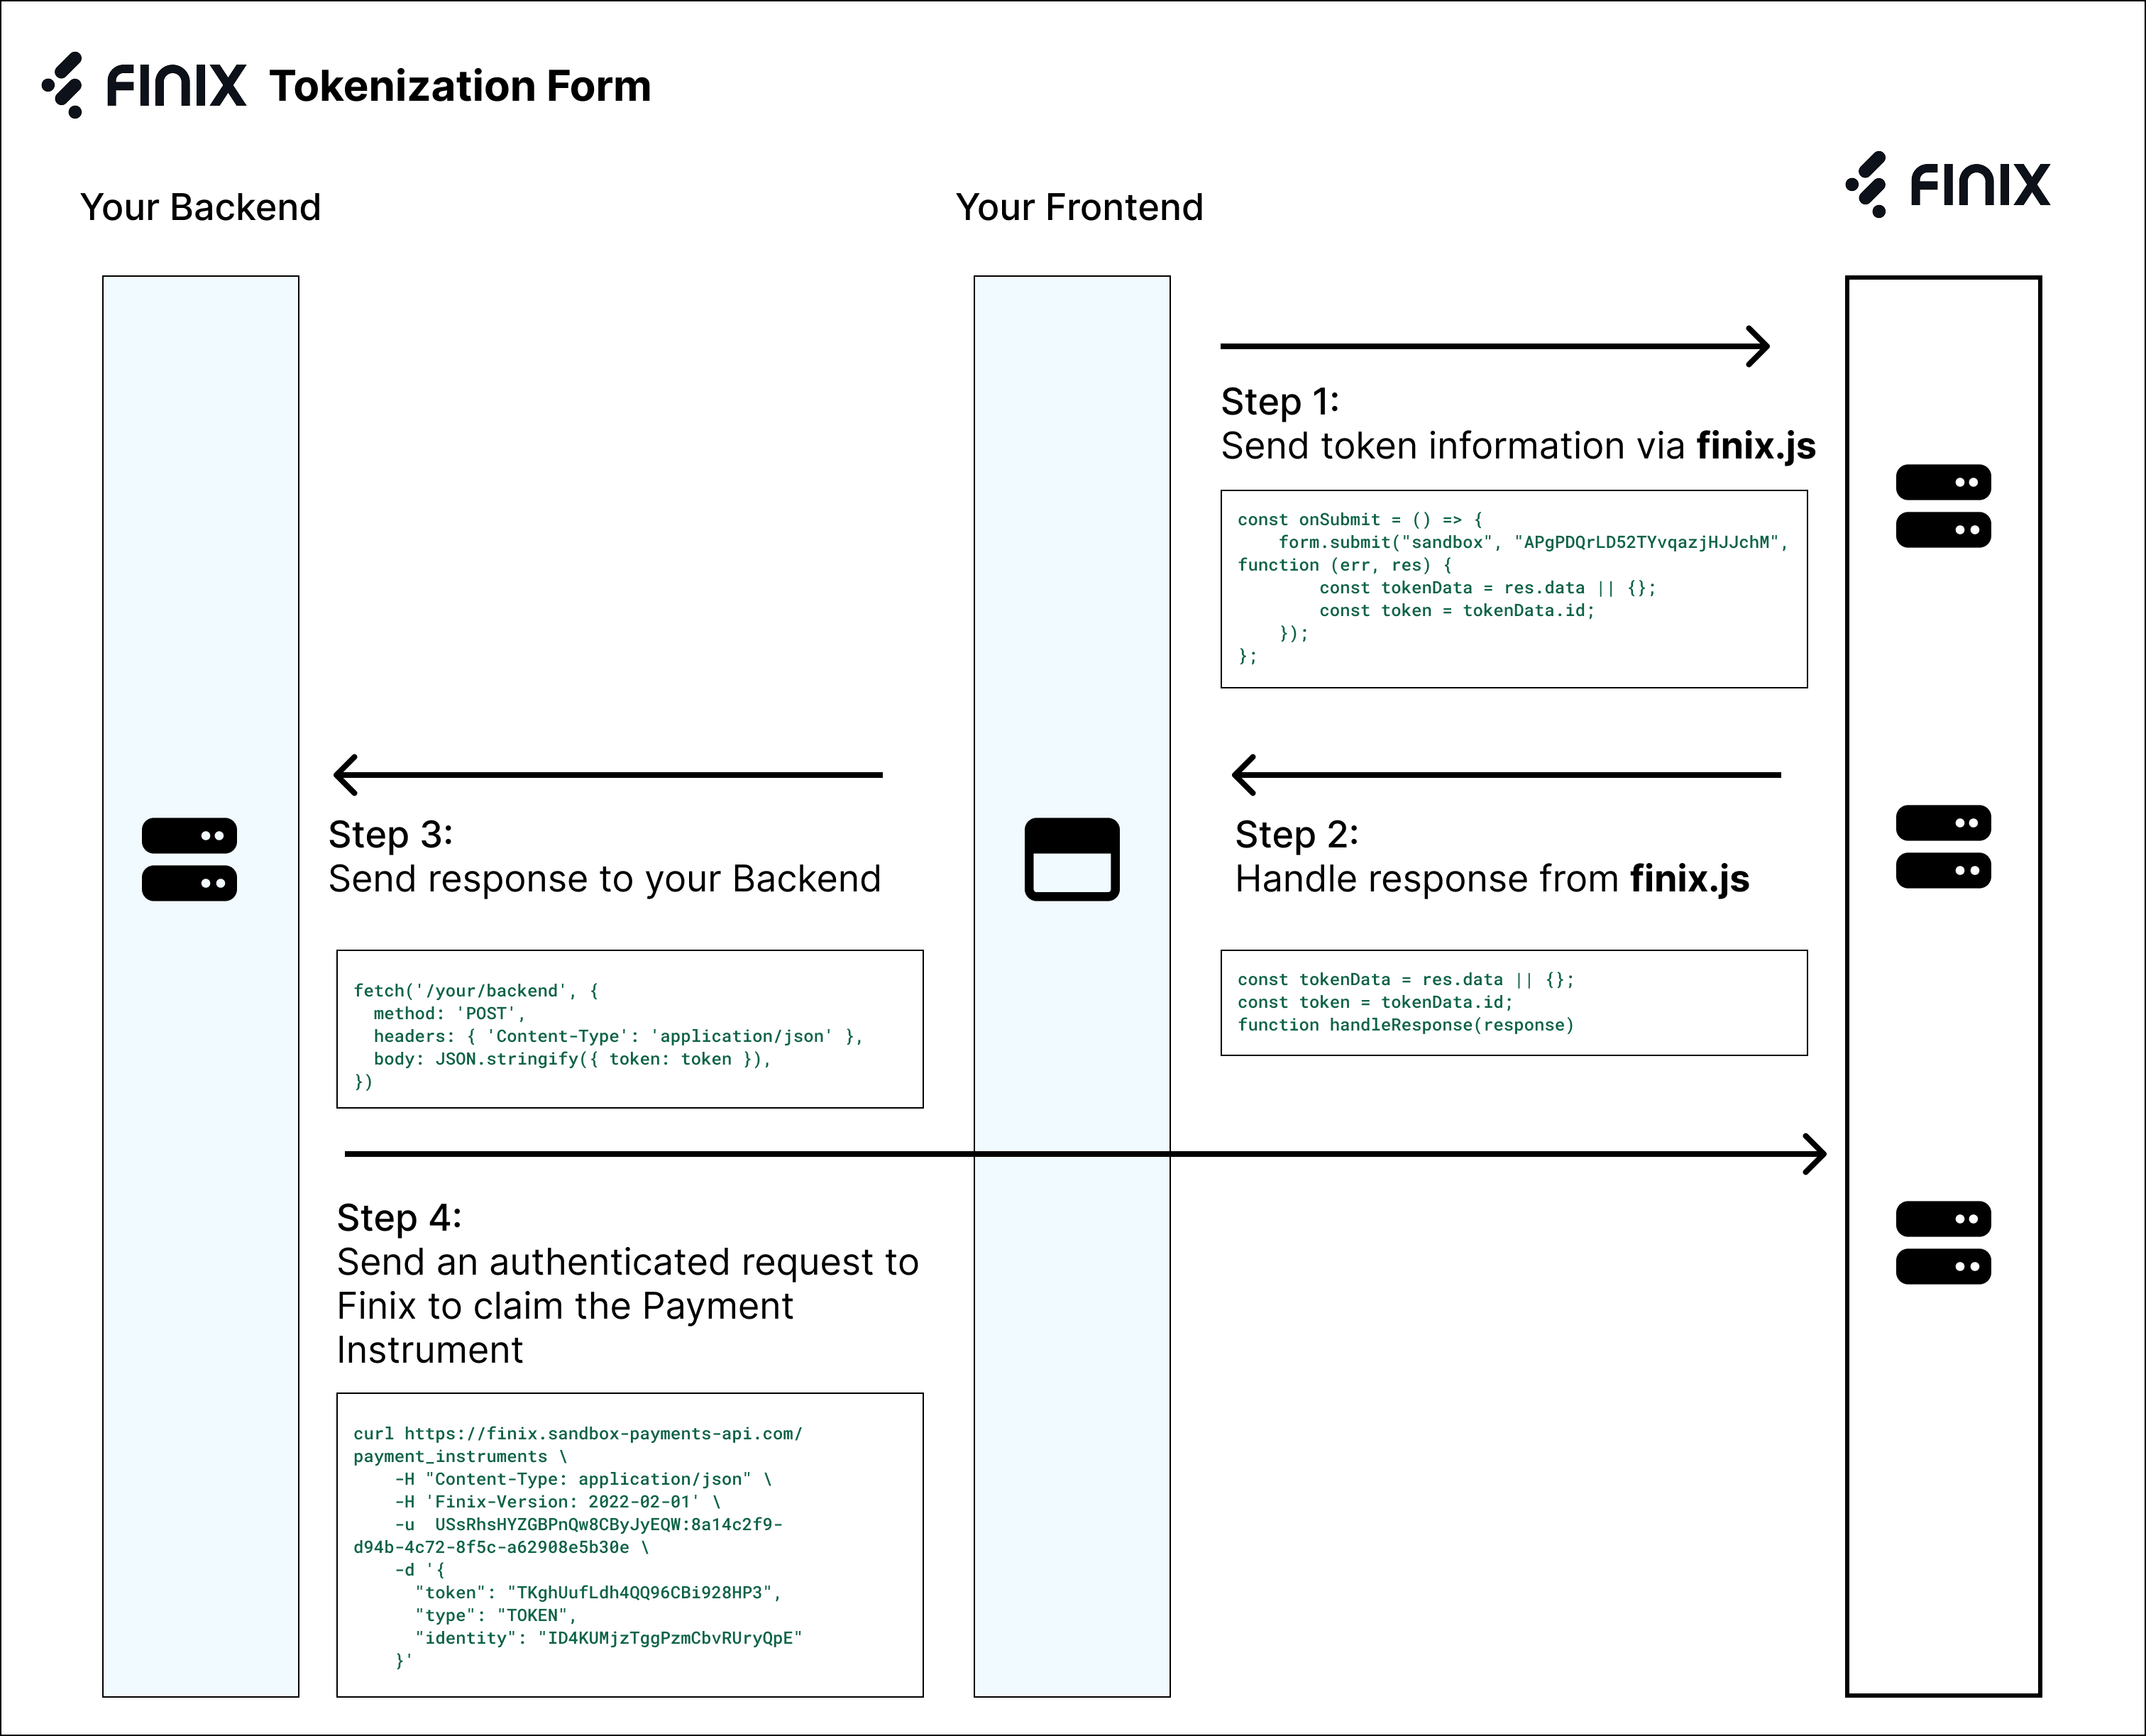
}Once you've handled the response, store the ID to utilize the token in the future. You will eventually send the token ID from your front-end client to your back-end server.
    const tokenData = res.data || {};     // get token ID from response
    const token = tokenData.id;
    function handleResponse(response) // This would be your custom logic
Many customers implement additional logic after a buyer enters their payment information, using the returned token. For example, some customers choose to implement a different workflow depending if a PAYMENT_CARD or BANK_ACCOUNT is returned by finix.js.
Now that you have the token, you should send this to your backend. You will need this ID to eventually do an authenticated call to Finix in the next step.
Tokens should be used to create a Payment Instrument right away in the next step. Tokens expire within 30 minutes and cannot be used after expiring.
fetch('/your/backend', {
  method: 'POST',
  headers: { 'Content-Type': 'application/json' },
  body: JSON.stringify({ token: token }),
})If you already created a Buyer Identity beforehand, you can skip this step.
Before you can run a Sale or an Authorization, you'll need:
- Create an
Identityfor the buyer. - Create a
Payment Instrumentwith the createdIdentityand thetokenfrom the previous step.
You can create an Identity with minimal or no information.
- To avoid asking for the same info multiple times, you don't need to request additional information from the buyer when creating an
Identity. - You don't need to create an additional
Identityfor the buyer if one already exists.
To create an Identity, make a POST request with whatever details you've gathered (e.g. name, email, phone), or create an empty Identity by leaving the entity empty:
- Sandbox serverhttps://finix.sandbox-payments-api.com/identities
curl -i -X POST \
  -u USfdccsr1Z5iVbXDyYt7hjZZ:313636f3-fac2-45a7-bff7-a334b93e7bda \
  https://finix.sandbox-payments-api.com/identities \
  -H 'Content-Type: application/json' \
  -H 'Finix-Version: 2022-02-01' \
  -d '{
    "entity": {}
  }'
Example response:
{
  "id": "IDcjL3Jv7S63B859Uwmnek25",
  "created_at": "2025-12-08T17:12:03.33Z",
  "updated_at": "2025-12-08T17:12:03.33Z",
  "application": "APc9vhYcPsRuTSpKD9KpMtPe",
  "entity": {
    "ach_max_transaction_amount": 0,
    "amex_mid": null,
    "annual_card_volume": 0,
    "business_address": null,
    "business_name": null,
    "business_phone": null,
    "business_tax_id_fingerprint": null,
    "business_tax_id_provided": false,
    "business_type": null,
    "default_statement_descriptor": null,
    "discover_mid": null,
    "dob": null,
    "doing_business_as": null,
    "email": null,
    "first_name": null,
    "has_accepted_credit_cards_previously": false,
    "incorporation_date": null,
    "last_name": null,
    "max_transaction_amount": 0,
    "mcc": null,
    "ownership_type": null,
    "personal_address": {
      "line1": null,
      "line2": null,
      "city": null,
      "region": null,
      "postal_code": null,
      "country": null
    },
    "phone": null,
    "principal_percentage_ownership": null,
    "short_business_name": null,
    "tax_authority": null,
    "tax_id_fingerprint": null,
    "tax_id_provided": false,
    "title": null,
    "url": null
  },
  "identity_roles": [
    "BUYER"
  ],
  "tags": {},
  "type": "PERSONAL",
  "_links": {
    "self": {
      "href": "https://finix.sandbox-payments-api.com/identities/IDcjL3Jv7S63B859Uwmnek25"
    },
    "verifications": {
      "href": "https://finix.sandbox-payments-api.com/identities/IDcjL3Jv7S63B859Uwmnek25/verifications"
    },
    "merchants": {
      "href": "https://finix.sandbox-payments-api.com/identities/IDcjL3Jv7S63B859Uwmnek25/merchants"
    },
    "settlements": {
      "href": "https://finix.sandbox-payments-api.com/identities/IDcjL3Jv7S63B859Uwmnek25/settlements"
    },
    "authorizations": {
      "href": "https://finix.sandbox-payments-api.com/identities/IDcjL3Jv7S63B859Uwmnek25/authorizations"
    },
    "transfers": {
      "href": "https://finix.sandbox-payments-api.com/identities/IDcjL3Jv7S63B859Uwmnek25/transfers"
    },
    "payment_instruments": {
      "href": "https://finix.sandbox-payments-api.com/identities/IDcjL3Jv7S63B859Uwmnek25/payment_instruments"
    },
    "associated_identities": {
      "href": "https://finix.sandbox-payments-api.com/identities/IDcjL3Jv7S63B859Uwmnek25/associated_identities"
    },
    "disputes": {
      "href": "https://finix.sandbox-payments-api.com/identities/IDcjL3Jv7S63B859Uwmnek25/disputes"
    },
    "application": {
      "href": "https://finix.sandbox-payments-api.com/applications/APc9vhYcPsRuTSpKD9KpMtPe"
    }
  }
}
Some customers choose to update this Identity at a later time with a PUT request using the information from the Payment Instrument below.
Create a Payment Instrument by making a POST request to /payment_instruments with the relevant token and the Identity#id created for the buyer. To learn the available fields, please see create a payment_instrument.
To create a Card Payment Instrument:
- Sandbox serverhttps://finix.sandbox-payments-api.com/payment_instruments
curl -i -X POST \
  -u USfdccsr1Z5iVbXDyYt7hjZZ:313636f3-fac2-45a7-bff7-a334b93e7bda \
  https://finix.sandbox-payments-api.com/payment_instruments \
  -H 'Content-Type: application/json' \
  -H 'Finix-Version: 2022-02-01' \
  -d '{
    "identity": "IDjvxGeXBLKH1V9YnWm1CS4n",
    "token": "TKiMxe323RE5Dq3wLVtG8kSW",
    "type": "TOKEN"
  }'
Example response after creating a card payment instrument:
{
  "id": "PImmCg3Po7oNi7jaZcXhfkEu",
  "created_at": "2022-10-10T05:32:17.78Z",
  "updated_at": "2022-10-10T05:32:17.78Z",
  "account_updater_enabled": false,
  "application": "APgPDQrLD52TYvqazjHJJchM",
  "created_via": "API",
  "currency": "USD",
  "enabled": true,
  "fingerprint": "FPRiCenDk2SoRng7WjQTr7RJY",
  "identity": "IDgWxBhfGYLLdkhxx2ddYf9K",
  "instrument_type": "PAYMENT_CARD",
  "address": {
    "line1": "900 Metro Center Blv",
    "line2": null,
    "city": "San Francisco",
    "region": "CA",
    "postal_code": "94404",
    "country": "USA"
  },
  "address_verification": "UNKNOWN",
  "bin": "520082",
  "brand": "MASTERCARD",
  "card_type": "DEBIT",
  "expiration_month": 12,
  "expiration_year": 2029,
  "issuer_country": "NON_USA",
  "last_four": "8210",
  "name": "Amy White",
  "network_token_enabled": false,
  "network_token_state": "NOT_ENABLED",
  "security_code_verification": "UNKNOWN",
  "tags": {
    "card_name": "Business Card"
  },
  "type": "PAYMENT_CARD",
  "_links": {
    "self": {
      "href": "https://finix.sandbox-payments-api.com/payment_instruments/PImmCg3Po7oNi7jaZcXhfkEu"
    },
    "authorizations": {
      "href": "https://finix.sandbox-payments-api.com/payment_instruments/PImmCg3Po7oNi7jaZcXhfkEu/authorizations"
    },
    "transfers": {
      "href": "https://finix.sandbox-payments-api.com/payment_instruments/PImmCg3Po7oNi7jaZcXhfkEu/transfers"
    },
    "verifications": {
      "href": "https://finix.sandbox-payments-api.com/payment_instruments/PImmCg3Po7oNi7jaZcXhfkEu/verifications"
    },
    "application": {
      "href": "https://finix.sandbox-payments-api.com/applications/APgPDQrLD52TYvqazjHJJchM"
    },
    "identity": {
      "href": "https://finix.sandbox-payments-api.com/identities/IDgWxBhfGYLLdkhxx2ddYf9K"
    },
    "updates": {
      "href": "https://finix.sandbox-payments-api.com/payment_instruments/PImmCg3Po7oNi7jaZcXhfkEu/updates"
    }
  }
}For cards, the type is saved in card_type. Available values for Payment Instruments with type: PAYMENT_CARD include:
CREDITDEBITHSA_FSANON_RELOADABLE_PREPAIDRELOADABLE_PREPAIDUNKNOWN
If you are interested in updating a payment_instrument, you can do so. This is helpful if you already have buyer address and don't want to collect it on the token_form. To learn the available fields to update, please see update an payment_instrument.
The example below shows a minimal implementation using Finix.PaymentForm:
document.addEventListener("DOMContentLoaded", () => {
  Finix.PaymentForm(
    "finix-form",
    "sandbox",
    "APgPDQrLD52TYvqazjHJJchM",
    {
      onSubmit(error, response) {
        if (error) {
          console.error(error);
          alert("Error creating token");
          return;
        }
        const tokenId = response?.data?.id;
        alert("Your token ID is: " + tokenId);
        console.log("Token Response:", response);
      },
    }
  );
});If you prefer to use your own submit button instead of the auto-generated one, you can handle form submission manually:
document.addEventListener("DOMContentLoaded", () => {
  const submitElement = document.getElementById("submit");

  const form = Finix.PaymentForm(
    "finix-form",
    "sandbox",
    "APgPDQrLD52TYvqazjHJJchM",
    {
      onUpdate: function(state, binInformation, hasErrors) {
        submitElement.disabled = hasErrors;
      }
    }
  );

  submitElement.addEventListener("click", function() {
    form.submit(function(error, response) {
      if (error) {
        console.error(error);
        alert("Error creating token");
        return;
      }
      const tokenId = response?.data?.id;
      alert("Your token ID is: " + tokenId);
      console.log("Token Response:", response);
    });
  });
});If you want to see our Tokenization Forms in action, visit our sample store. You can view our related github project here.
The example below shows how to integrate Finix.PaymentForm with React:
import React, { useEffect } from 'https://esm.sh/react@18.2.0';
import ReactDOM from 'https://esm.sh/react-dom@18.2.0';

const FinixForm = () => {
  useEffect(() => {
    // Create finix.js V2 Payment Form
    const form = Finix.PaymentForm(
      'form',
      'sandbox',
      'APgPDQrLD52TYvqazjHJJchM',
      {
        showAddress: true,
        // onSubmit callback automatically creates a submit button
        onSubmit: function (error, response) {
          if (error) {
            console.error("Tokenization error:", error);
            return;
          }
          // get token ID from response
          const tokenData = response.data || {};
          const token = tokenData.id;
          alert("Your token ID is: " + token);
        },
      }
    );
  }, []);

  return React.createElement('div', null, [
    React.createElement('h2', { key: 'header' }, 'Finix Payment Form Demo'),
    React.createElement('div', { id: 'form', key: 'form' })
  ]);
};

ReactDOM.render(React.createElement(FinixForm), document.getElementById('app'));Below is a comprehensive example of all the available options for the Finix.PaymentForm function.
document.addEventListener("DOMContentLoaded", () => {

  const options = {
    // ============================================================
    // PAYMENT METHOD CONFIGURATION
    // ============================================================

    // Specify which payment methods to allow
    // Options: ["card", "bank"], ["card"], or ["bank"]
    // Default: ["card", "bank"]
    // paymentMethods: ["card", "bank"],

    // ============================================================
    // ADDRESS FIELDS
    // ============================================================

    // Show address fields in the form
    // Default: false
    showAddress: true,

    // ============================================================
    // LABELS
    // ============================================================

    // Show labels above each input field
    // Default: true
    showLabels: true,

    // Custom labels for each field
    // Card fields: card_holder_name, number, expiration_date, security_code
    // Bank fields: account_holder_name, account_number, bank_code, account_type
    // Address fields: address_line1, address_line2, address_city, address_region, address_postal_code, address_country
    labels: {
      card_holder_name: "Full Name",
      // number: "Card Number",
      // expiration_date: "Expiration Date",
      // security_code: "CVV",
      // account_holder_name: "Account Holder Name",
      // account_number: "Account Number",
      // bank_code: "Routing Number",
      // account_type: "Account Type",
      // address_line1: "Street Address",
      // address_line2: "Apt, Suite, etc.",
      // address_city: "City",
      // address_region: "State/Region",
      // address_postal_code: "Postal Code",
      // address_country: "Country",
    },

    // ============================================================
    // PLACEHOLDERS
    // ============================================================

    // Show placeholder text in input fields
    // Default: true
    showPlaceholders: true,

    // Custom placeholders for each field
    // Card fields: card_holder_name, number, expiration_date, security_code
    // Bank fields: account_holder_name, account_number, bank_code, account_type
    // Address fields: address_line1, address_line2, address_city, address_region, address_postal_code, address_country
    placeholders: {
      card_holder_name: "Full Name",
      // number: "4111 1111 1111 1111",
      // expiration_date: "MM/YY",
      // security_code: "123",
      // account_holder_name: "John Doe",
      // account_number: "000123456789",
      // bank_code: "110000000",
      // account_type: "Checking",
      // address_line1: "123 Main St",
      // address_line2: "Apt 4B",
      // address_city: "San Francisco",
      // address_region: "CA",
      // address_postal_code: "94102",
      // address_country: "USA",
    },

    // ============================================================
    // DEFAULT VALUES
    // ============================================================

    // Pre-fill values for fields (cannot pre-fill card/bank numbers due to PCI compliance)
    // Supported: card_holder_name, account_holder_name, address_line1, address_line2,
    //            address_city, address_region, address_postal_code, address_country
    defaultValues: {
      // card_holder_name: "John Doe",
      // account_holder_name: "John Doe",
      // address_line1: "123 Main St",
      // address_line2: "Apt 4B",
      // address_city: "San Francisco",
      // address_region: "CA",
      // address_postal_code: "94102",
      // address_country: "USA",
    },

    // ============================================================
    // HIDE FIELDS
    // ============================================================

    // Hide specific fields that you do not need
    // Note: "number" and "expiration_date" cannot be hidden as they are required by networks
    // Supported: card_holder_name, security_code, account_holder_name, address_line1,
    //            address_line2, address_city, address_region, address_postal_code, address_country
    hideFields: [
      // "card_holder_name",
      // "security_code",
      // "account_holder_name",
      // "address_line1",
      // "address_line2",
      // "address_city",
      // "address_region",
      // "address_postal_code",
      // "address_country",
    ],

    // ============================================================
    // REQUIRED FIELDS
    // ============================================================

    // Require specific fields that are not required by default
    // Supported: card_holder_name, account_holder_name, address_line1, address_line2,
    //            address_city, address_region, address_postal_code, address_country
    requiredFields: [
      "card_holder_name",
      "address_line1",
      "address_city",
      "address_region",
      "address_country",
      "address_postal_code",
    ],

    // ============================================================
    // SECURITY & VALIDATION OPTIONS
    // ============================================================

    // Require security code (CVV/CVC) for card payments
    // Default: true
    // requireSecurityCode: true,

    // Show double confirmation input for bank account numbers
    // Validates both entries match to reduce incorrect account numbers
    // Default: true
    // confirmAccountNumber: true,

    // Hide warning messages for non-standard but valid card numbers
    // Default: true
    // hidePotentialIssueMessages: true,

    // ============================================================
    // ERROR MESSAGES
    // ============================================================

    // Hide input error messages entirely
    // Default: false
    hideErrorMessages: false,

    // Custom error messages for each field
    // Card fields: card_holder_name, number, expiration_date, security_code
    // Bank fields: account_holder_name, account_number, bank_code, account_type
    // Address fields: address_line1, address_line2, address_city, address_region, address_postal_code, address_country
    errorMessages: {
      card_holder_name: "Please enter a valid name",
      // number: "Please enter a valid card number",
      // expiration_date: "Please enter a valid expiration date",
      // security_code: "Please enter a valid security code",
      // account_holder_name: "Please enter the account holder name",
      // account_number: "Please enter a valid account number",
      // bank_code: "Please enter a valid routing number",
      // account_type: "Please select an account type",
      // address_line1: "Please enter a valid street address",
      // address_line2: "Please enter a valid address line 2",
      address_city: "Please enter a valid city",
      // address_region: "Please enter a valid state/region",
      // address_postal_code: "Please enter a valid postal code",
      // address_country: "Please enter a valid country",
    },

    // ============================================================
    // THEME & APPEARANCE
    // ============================================================

    // Set the visual theme of the form
    // Options: finix, amethyst, sapphire, topaz, ruby, emerald, midnight, elevated
    // Default: "finix"
    // theme: "finix",

    // Enable dark mode styling for the payment form
    // Default: false
    // enableDarkMode: false,

    // ============================================================
    // PLAID SETTINGS (for bank account linking)
    // ============================================================

    // Configure Plaid bank account settings
    // plaidLinkSettings: {
    //   displayName: "Your Merchant Name",  // Name shown at top of Plaid modal
    //   language: "en",                      // Language for Plaid experience (default: "en")
    //   countries: ["USA", "CAN"],           // ISO-3 country codes (default: ["USA", "CAN"])
    // },

    // ============================================================
    // CUSTOM STYLES
    // ============================================================

     // Custom styles for the form inputs.
    // Organized by theme (default/dark), then target element, then state.
    // Available targets: form, input, sectionHeader, section, submitButton
    styles: {
      // Base (light) theme
      default: {
        input: {
          // Default input state
          default: {
            color: "#000",
            border: "1px solid #CCCDCF",
            borderRadius: "8px",
            padding: "8px 16px",
            fontFamily: "Noto Sans Thaana",
            fontSize: "16px",
            boxShadow: "0px 1px 1px rgba(0, 0, 0, 0.03), 0px 2px 4px rgba(0, 0, 0, 0.03)",
          },
          // Styling when the field is valid
          success: {
            // border: "1px solid #5cb85c",
          },
          // Styling when the field has errors
          error: {
            // color: "#d9534f",
            border: "1px solid rgba(255,0,0,0.3)",
          },
          // Styling when the field is focused
          focused: {
            // border: "1px solid #0070f3",
          },
        },
        submitButton: {
          default: {},
          disabled: {
            // opacity: 0.5,
          },
        },
      },
      // Optional dark mode overrides (applied on top of default when dark mode is active)
      // dark: {},
    },

    // ============================================================
    // CUSTOM FONTS
    // ============================================================

    // Custom fonts for input text (requires HTTPS hosted font file)
    // To use custom fonts, set the fontFamily in the styles.default above
    fonts: [
      {
        fontFamily: "Noto Sans Thaana",
        url: "https://fonts.cdnfonts.com/s/107457/NotoSansThaana[wght].woff",
        format: "woff",
      },
    ],

    // ============================================================
    // SUBMIT BUTTON
    // ============================================================

    // Label for the auto-generated submit button
    submitLabel: "Create Token",

    // ============================================================
    // CALLBACK FUNCTIONS
    // ============================================================

    // Callback function that triggers after the form has loaded
    onLoad: function () {
      console.log("Payment form loaded");
    },

    // Callback function that triggers when form state changes
    // Parameters:
    //   state: Object with form metadata (valid, dirty, pristine - no PI data exposed)
    //   binInformation: Object with BIN data (BIN number, card brand)
    //   hasErrors: Boolean indicating if form has errors (useful for custom submit buttons)
    onUpdate: function (state, binInformation, hasErrors) {
      // console.log("Form state:", state);
      // console.log("BIN info:", binInformation);
      // console.log("Has errors:", hasErrors);
    },

    // Callback function for form submission
    // Adding this option automatically creates a submit button
    // Parameters:
    //   error: Error object if submission failed, null otherwise
    //   response: Response object containing token data
    onSubmit: function (error, response) {
      if (error) {
        console.error(error);
        alert("Error creating token");
        return;
      }
      const tokenId = response?.data?.id;
      alert("Your token ID is: " + tokenId);
      console.log("Token Response:", response);
    },
  };

  // ============================================================
  // INITIALIZE THE PAYMENT FORM
  // ============================================================

  // Create finix.js V2 Payment Form
  // Parameters:
  //   element: The ID of the HTML element where the form will render
  //   environment: "sandbox" or "live"
  //   applicationId: Your Finix application ID
  //   options: Configuration options object
  Finix.PaymentForm(
    "form-element",
    "sandbox",
    "APgPDQrLD52TYvqazjHJJchM",
    options
  );
});For customers that are on our earlier finix.js v1 library, see our migration guide here.